Mobile Manipulation
Versions to run the exercise
Currently, there are 2 versions for running this exercise:
- ROSNode Templates
- Web Templates(In Development)
The instructions for both of them are provided as follows.
Goal
The goal of this exercise is to practice integrating navigation and manipulation. You will need to use a mobile manipulator(AGV+robot arm+gripper) to pick objects on one conveyor and place them on three other conveyors.
The mobile manipulator is MMO-500 robot from Neobotix. They provides a set of ROS simulation packages and tutorials to test their mobile robot and mobile manipulators[1]. The MMO-500 is one of them, combining the omnidirectional robot MPO-500 with a light-weight robot arm UR10. The navigation part of this exercise is based on their provided packages.
Installation
-
Download Docker. Windows users should choose WSL 2 backend Docker installation if possible, as it has better performance than Hyper-V.
-
Pull the current distribution of RoboticsBackend
docker pull jderobot/robotics-backend:2.4.2 -
In order to obtain optimal performance, Docker should be using multiple CPU cores. In case of Docker for Mac or Docker for Windows, the VM should be assigned a greater number of cores.
Enable GPU Acceleration
- For Linux machines with NVIDIA GPUs, acceleration can be enabled by using NVIDIA proprietary drivers, installing VirtualGL and executing the following docker run command:
docker run --rm -it --device /dev/dri -p 7164:7164 -p 2303:2303 -p 1905:1905 -p 8765:8765 -p 6080:6080 -p 1108:1108 jderobot/robotics-backend:2.4.2 ./start.sh - For Windows machines, GPU acceleration to Docker is an experimental approach and can be implemented as per instructions given here
How to perform the exercise?
-
Start a new docker container of the image and keep it running in the background (hardware accelerated version)
docker run --rm -it -p 7164:7164 -p 2303:2303 -p 1905:1905 -p 8765:8765 -p 6080:6080 -p 1108:1108 jderobot/robotics-backend:2.4.2 ./start.sh -
On the local machine navigate to 127.0.0.1:7164/ in the browser and choose the desired exercise.
-
Click the connect button and wait for some time until an alert appears with the message
Connection Establishedand button displays connected. -
The exercise can be used after the alert.
Where to insert the code?
In the launched webpage, type your code in the text editor,
import WebGUI
import HAL
# Enter sequential code!


while True:
    # Enter iterative code!
Using the Interface
-
Control Buttons: The control buttons enable the control of the interface. Play button sends the code written by User to the Robot. Stop button stops the code that is currently running on the Robot. Save button saves the code on the local machine. Load button loads the code from the local machine. Reset button resets the simulation(primarily, the position of the robot).
-
Brain and GUI Frequency: This input shows the running frequency of the iterative part of the code (under the
while True:). A smaller value implies the code runs less number of times. A higher value implies the code runs a large number of times. The numerator is the one set as the Measured Frequency who is the one measured by the computer (a frequency of execution the computer is able to maintain despite the commanded one) and the input (denominator) is the Target Frequency which is the desired frequency by the student. The student should adjust the Target Frequency according to the Measured Frequency. -
RTF (Real Time Factor): The RTF defines how much real time passes with each step of simulation time. A RTF of 1 implies that simulation time is passing at the same speed as recal time. The lower the value the slower the simulation will run, which will vary depending on the computer.
-
Pseudo Console: This shows the error messages related to the student’s code that is sent. In order to print certain debugging information on this console. The student can use the
print()command in the Editor.
Robot API
import HAL- to import the HAL(Hardware Abstraction Layer) library class. This class contains the functions that sends and receives information to and from the Hardware(Gazebo).import WebGUI- to import the GUI(Graphical User Interface) library class. This class contains the functions used to view the debugging information, like image widgets.HAL.back_to_home()- Command the robot arm and gripper to move back to the home pose.HAL.pickup()- to set the linear speedHAL.place()- to set the angular velocityHAL.move_pose_arm(pose_goal)- Command the robot with Pose message to make its end effector frame move to the desired pose with inverse kinematics.HAL.move_joint_hand(joint_value)- Command the gripper joint to move to desired joint value.HAL.get_object_pose(object_name)- Return the pose of the object.HAL.get_target_position(target_name)- Return the position of target where we are going to place the objects.HAL.get_target_pose(target_name)- get the goal pose of the robot to stop in front of conveyor with target_name. The goal pose for each stop position is specified in navigation.yaml file.HAL.send_goal_to_client(pose)- send the goal pose to move_base client.HAL.get_result_from_client()- get navigation result from client. If the result is True, navigation is finished.HAL.move_to_pick_place_home([move_gripper=True])- Command the robot arm and gripper to move back to the home pose to get ready for pick or place. If move_group is set to to False, the gripper won’t move.HAL.spawn_obstacle_rviz()- Spawn the model of obstacle in planning scene.
Instructions for ROSNode Templates
Installation
- Install the General Infrastructure of the JdeRobot Robotics Academy.
- Install
sudo apt-get install ros-melodic-eband-local-planner sudo apt-get install ros-melodic-amcl sudo apt-get install ros-melodic-openslam-gmapping sudo apt-get install ros-melodic-navigation - Install Industrial Robot package
If you have done this part in other Industrial Robots exercises, you can skip to next section.
mkdir -p catkin_ws/src
cd catkin_ws/src
after pull request to the industrial robot repo
git clone https://github.com/JdeRobot/IndustrialRobotics.git -b melodic_devel
cd ..
Update ROS dependencies
rosdep update
rosdep check --from-paths . --ignore-src --rosdistro melodic
rosdep install --from-paths . --ignore-src --rosdistro melodic -y
Build workspace
catkin buildExport environment variables
echo 'source '$PWD'/devel/setup.bash' >> ~/.bashrc
echo 'export GAZEBO_MODEL_PATH=${GAZEBO_MODEL_PATH}:'$PWD'/src/IndustrialRobotics/assets/models' >> ~/.bashrc
source ~/.bashrc
How to run the exercise
Tp launch the exercise, open a terminal windows, navigate tomobile_manipulation folder inside exercises folder and execute following command:
roslaunch mobile_manipulation.launch
Two different windows will pop up:
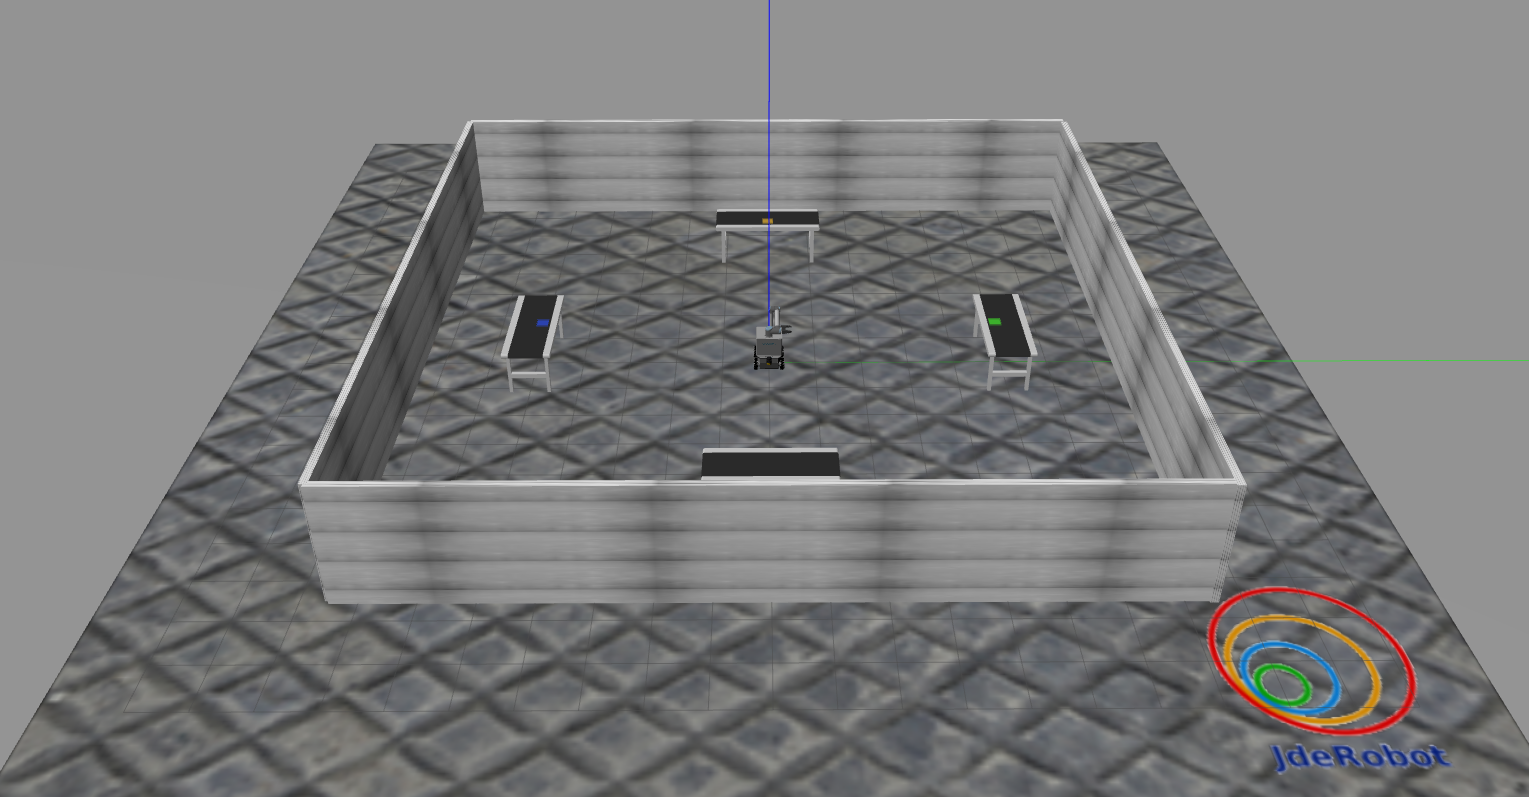
- Gazebo simulator: A warehouse environment with a industrial robot(robot arm and gripper), multiple objects, a conveyor and two boxes will be shown in Gazebo.
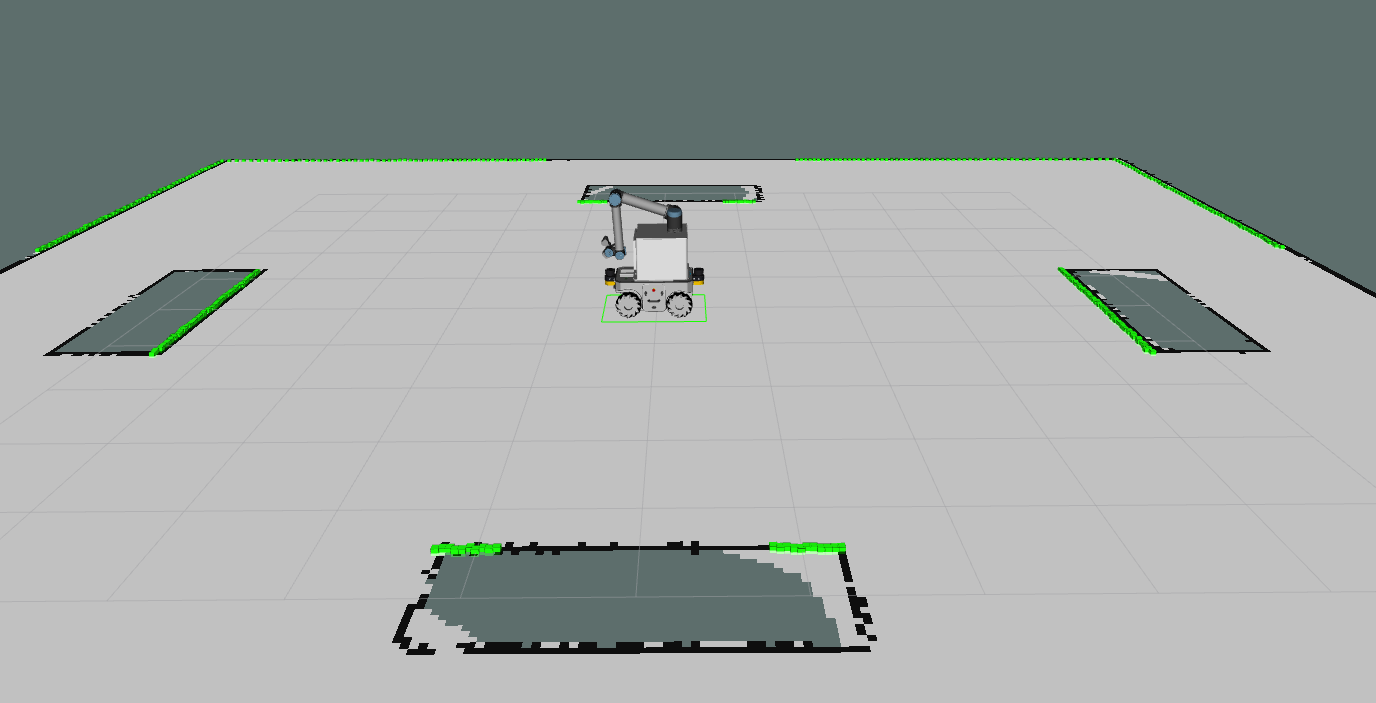
- Rviz: A mobile manipulator, map and laser detected obstacle points will be shown in Rviz.
When you see You can start planning now!, open a new terminal window, navigate to mobile_manipulation folder inside exercises folder and execute following command:
roslaunch mobile_manipulation_gui.launch
The mobile manipulator teleoperator GUI will pop up and objects will be spawned in Gazebo.
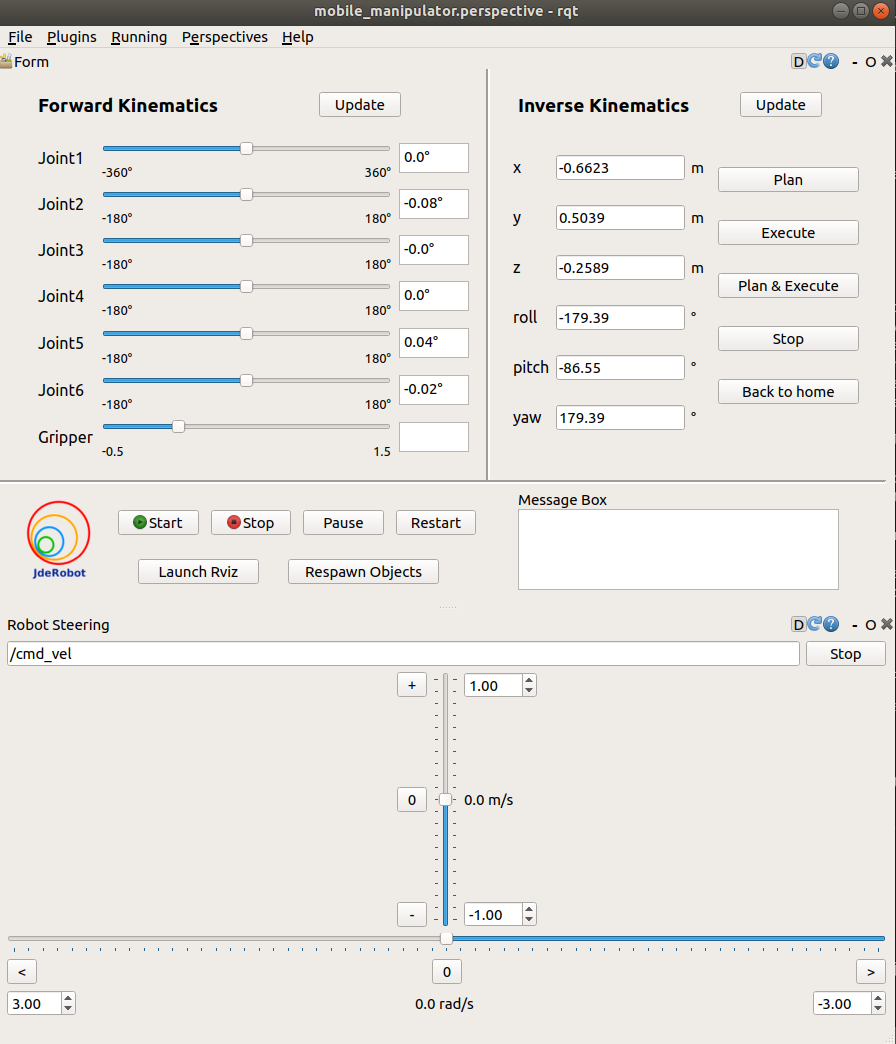
- mobile manipulator teleoperator: A GUI which provides following functionalities:
- A Forward Kinematics teleoperator providing sliders to change the angle of each joint of the robot arm and the gripper. The limits of each joints are shown in the two sides of the slider. The true angle of the joints are shown in the text box beside the sliders.
- An Inverse Kinematics teleoperator allowing users to set the desired end effector pose.
- Plan button can plan the trajectory to the desired pose
- Execute button can make the robot execute the planned trajectory
- Plan & Execute button is the integration of last two buttons
- Stop button allows users to stop the robot
- Back to home button can make the robot move back to home pose
- Two update button can update the value of current robot state
- Code Manager part
- Four buttons to start, stop, pause and restart the main code you program
- One button to launch Rviz
- One button to Respawn all objects in Gazebo and Rviz
- An info box showing the status of the main code(“start” or “stop”)
- Robot Steering part to send velocity signal to move mobile robot.
Then open a new terminal window, navigate to mobile_manipulation folder inside exercises folder and execute following command:
python MyAlgorithm.py
You can start running the algorithm with the start button when you see You can start your algorithm with GUI in the terminal.
How should I solve the exercise
To solve the exercise, you must edit the MyAlgorithm.py file and insert control logic in myalgorithm() function. Before writing the main logic, you should implement move_to() function to navigate and move mobile robot to given target.
def move_to(self, target_name):
    ############## Insert your code here ###############
    self.pick_place.send_message("move to "+target_name)
    ####################################################

def myalgorithm(self, stopevent, pauseevent):
	############## Insert your code here ###############
    # Move the robot arm back to home as a start
    self.pick_place.back_to_home()

    # insert following two lines where you want to pause or stop the algorithm
    # with the stop button in GUI
    while (not self.pauseevent.isSet()) or (not self.stopevent.isSet()):
        if not self.stopevent.isSet():
            return

    ##### A brief example to pick green cylinder on conveyor1 and place it to conveyor2 #####

    ## Move to the target pose to stop in front of conveyor1
    self.move_to("conveyor1")

    ## Pick green cylinder

    ## Move to the target pose to stop in front of conveyor2
    self.move_to("conveyor2")

    ## Place green cylinder

    ####################################################
API
Navigation
self.client.get_target_pose(target_name)- get the goal pose of the robot to stop in front of conveyor with target_name. The goal pose for each stop position is specified innavigation.yamlfile.self.client.send_goal_to_client(pose)- send the goal pose to move_base client.self.client.get_result_from_client()- get navigation result from client. If the result isTrue, navigation is finished.
Following APIs are provided in Pick_Place class, so you should always add “self.pick_place.” as a prefix to following introduced APIs in your algorithm.
Environment Information
get_object_list()- Return the name list of all objects.get_object_info(object_name)- Return the height, width, length, shape, color of the object in order.get_object_pose(object_name)- Return the pose of object in the robot arm frame.get_target_list()- Return the name list of all targets.get_target_position(target_name)- Return the position of target where we are going to place the objects.get_target_pose(target_name)- Return the pose(x, y, theta) where the robot will stop in front of the target conveyor.
Convert Pose Message
pose2msg(roll, pitch, yaw, x, y, z)- Convert pose to Pose message. The unit of roll, pitch, yaw is radian.pose2msg_deg(roll, pitch, yaw, x, y, z)- Convert pose to Pose message. The unit of roll, pitch, yaw is degree.msg2pose(pose)- Convert Pose message to pose, return roll, pitch, yaw, x, y, z in order. The unit of roll, pitch, yaw is radian.msg2pose_deg(pose)- Convert Pose message to pose, return roll, pitch, yaw, x, y, z in order. The unit of roll, pitch, yaw is degree.
Basic Robot Movement
move_pose_arm(pose_goal)- Command the robot with Pose message to make its end effector frame move to the desired pose with inverse kinematics.move_joint_arm(joint_0,joint_1,joint_2,joint_3,joint_4,joint_5)- Command the robot joints to move to desired joints value.move_joint_hand(finger1_goal[, finger2_goal = 10, finger3_goal = 10])- Command the gripper finger joint to goal value. Iffinger2_goalandfinger3_goalare kept as 10, they will set to be the same asfinger1_goal. The range of finger goal value is [-1.57, 1.57].back_to_home([move_gripper=True])- Command the robot arm and gripper to move back to the home pose for moving process. Ifmove_groupis set to to False, the gripper won’t move.move_to_pick_place_home([move_gripper=True])- Command the robot arm and gripper to move back to the home pose to get ready for pick or place. Ifmove_groupis set to to False, the gripper won’t move.
Manage Objects and Obstacles in Planning Scene
spawn_all_objects()- Spawn all the model of objects ready to be picked in planning scene.spawn_obstacle_rviz(obstacle_name)- Spawn the model of obstacle in planning scene.clean_scene(object_name)- Remove the model of object of obstacle in planning scene.clean_all_objects_in_scene()- Remove all the model of objects ready to be picked in planning scene.
Pick and Place
pickup(object_name, position, width[, distance = 0.12])- Command the industrial robot to pick up the object by moving the end effextor to given position. Width is the goal gripper joint value. Distance is the distance the robot arm will move in z axis before and after grasping objects.place(object_name, position[, width = -0.2, distance = 0.12])- Command the industrial robot to place the object by moving the end effector to given position. Width is the goal gripper joint value. Distance is the distance the robot arm will move in z axis before and after placing objects.
Theory
Navigation
Navigation part is implemented by following steps. It is based on the simulation packages from Neobotix which integrated amcl, gmapping, eband_local_planner and some other related packages. If you are interested in the details of navigation implementation in ROS, check out their tutorial website.
- Built the map of the world: A map of the world is prebuilt using
gmappingpackage. If we want to change the world, a new map need to be generated and saved. - Localization: The
amclpackage is used to localize the robot. The odometry message of the robot will be published in/odomtopic which contains the pose between robotbase_linkandodomframe. - Navigation: The
move_basepackage will use both global planning and local planning to plan a path to the goal position, and drive the robot to achieve it.
Manipulation
Manipulation part is implemented by following steps.
- Load object info: Load the information of objects and obstacles from yaml file, including absolute pose, size, shape, color.
- Move to pick position: Make the robot stops in target position in front of the conveyor.
- Pick up object
- Move the robot arm to home position for pick and place task.
- Get robot pose from
/odomtopic and caculate the relative pose between object and robot. - Spawn the model of objects and conveyor into planning scene.
- Move to some distance above the object, move down and grasp the object.
- Delete the model of objects and conveyor in planning scene.
- Move to place position: Move robot arm to home position with the object in the gripper and move the mobile robot to the target position.
- Place object
- Move the robot arm to home position for pick and place task.
- Get robot pose from
/odomtopic and transform the place target position from world frame to robot frame. - Spawn the model of conveyor into planning scene.
- Move to some distance above the object, move down and grasp the object.
- Delete the model of conveyor in planning scene.
Hints
How to get the object pose and pick it up?
Motion planning for the robot arm is done by MoveIt in robot arm frame, so we need to know where are the objects we are going to grasp and where are obstacles and goal position to place objects. The poses of objects and obstacles in the world frame are known and assumed to be fixed until the objects are picked up. The robot pose and transformation between the base link of mobile manipulator and the base link of robot arm are also available, so the poses of objects and obstacles in robot arm frame can be computed. This part is implemented implicitly in API and available in get_object_position() and get_target_position(), but you still need to add objects and objects into planning scene before picking or placing and clean them before mobile robot moving to next position in the world.
Why does the gripper cannot stably grasp and release the object?
We are using gazebo_grasp_fix plugin for this exercise and the Pick Place exercise which compute the force vector between fingers to check collision and distance between object and fingers to decide whether release the object. It is because Gazebo cannot well simulates manipulation behavior. JUst keep in mind that though you might see the object shaking when the gripper is grasping it in simulation, it can usually success in the same condition in real world.
The input position for pickup() and place() function are both the position for the end of the gripper in releasing mode. The output position of get_object_position() is the position of the center of the object. Therefore, because when the gripper is grasping, final end point position will change, please remember to tune the input position to pick and place. In addition, sphere is the most difficult to grasp. Cylinder and box are easier if you use proper parameters.
Why does the mobile robot sometimes stops for a while after reaching the goal pose?
When the mobile robot doesn’t reach a pose within tolerance range of goal pose, it might stops for a while to check if it can improve its pose.
Object and Target lists:
Object list:
- blue_box
- yellow_ball
- green_cylinder
Target list:
conveyor1(main conveyor with objects on it)conveyor2(green tray)conveyor3(yellow tray)conveyor4(blue tray)
Ignorable ERROR and WARNING
No p gain specified for pid.
Following three errors can be ignored in the beginning, but if it keep spawning when you run your algorithm or move the robot with GUI, please relaunch the exercise.
Spawn service failed. Exiting.wait_for_service(/controller_manager/load_controller): failed to contact, will keep tryingNo laser scan received (and thus no pose updates have been published)Timed out waiting for transform from base_link to map to become available before running costmap
Demonstration video of the solution
References
Thanks for Neobotix engineer Pradheep Krishna Muthukrishnan Padmanabhan’s help with setting up the simulation package from Neobotix.