User Guide
1. Robotics Academy requirements
Robotics Academy supports Linux (Ubuntu 18.04, 20.04, 22.04, 24.04 and other distributions), MacOS and Windows.
The installation of ROS, Gazebo, etc. has been greatly simplified, as all the required dependencies are already pre-installed in the Robotics Backend (RoboticsBackend).
Minimum System Requirements
- CPU: A 4-cored processor.
- RAM: 2 gb RAM.
- Memory: 20 gb of disk space.
2. Robotics Academy on Windows
Step 0: Setup) Install Docker support: Docker Desktop
Please download Docker Desktop following the official documentation.
Step 0: Setup) Install WSL2
Please install Windows Subsytem for Linux (WSL2) following the official documentation if you do not have it already.
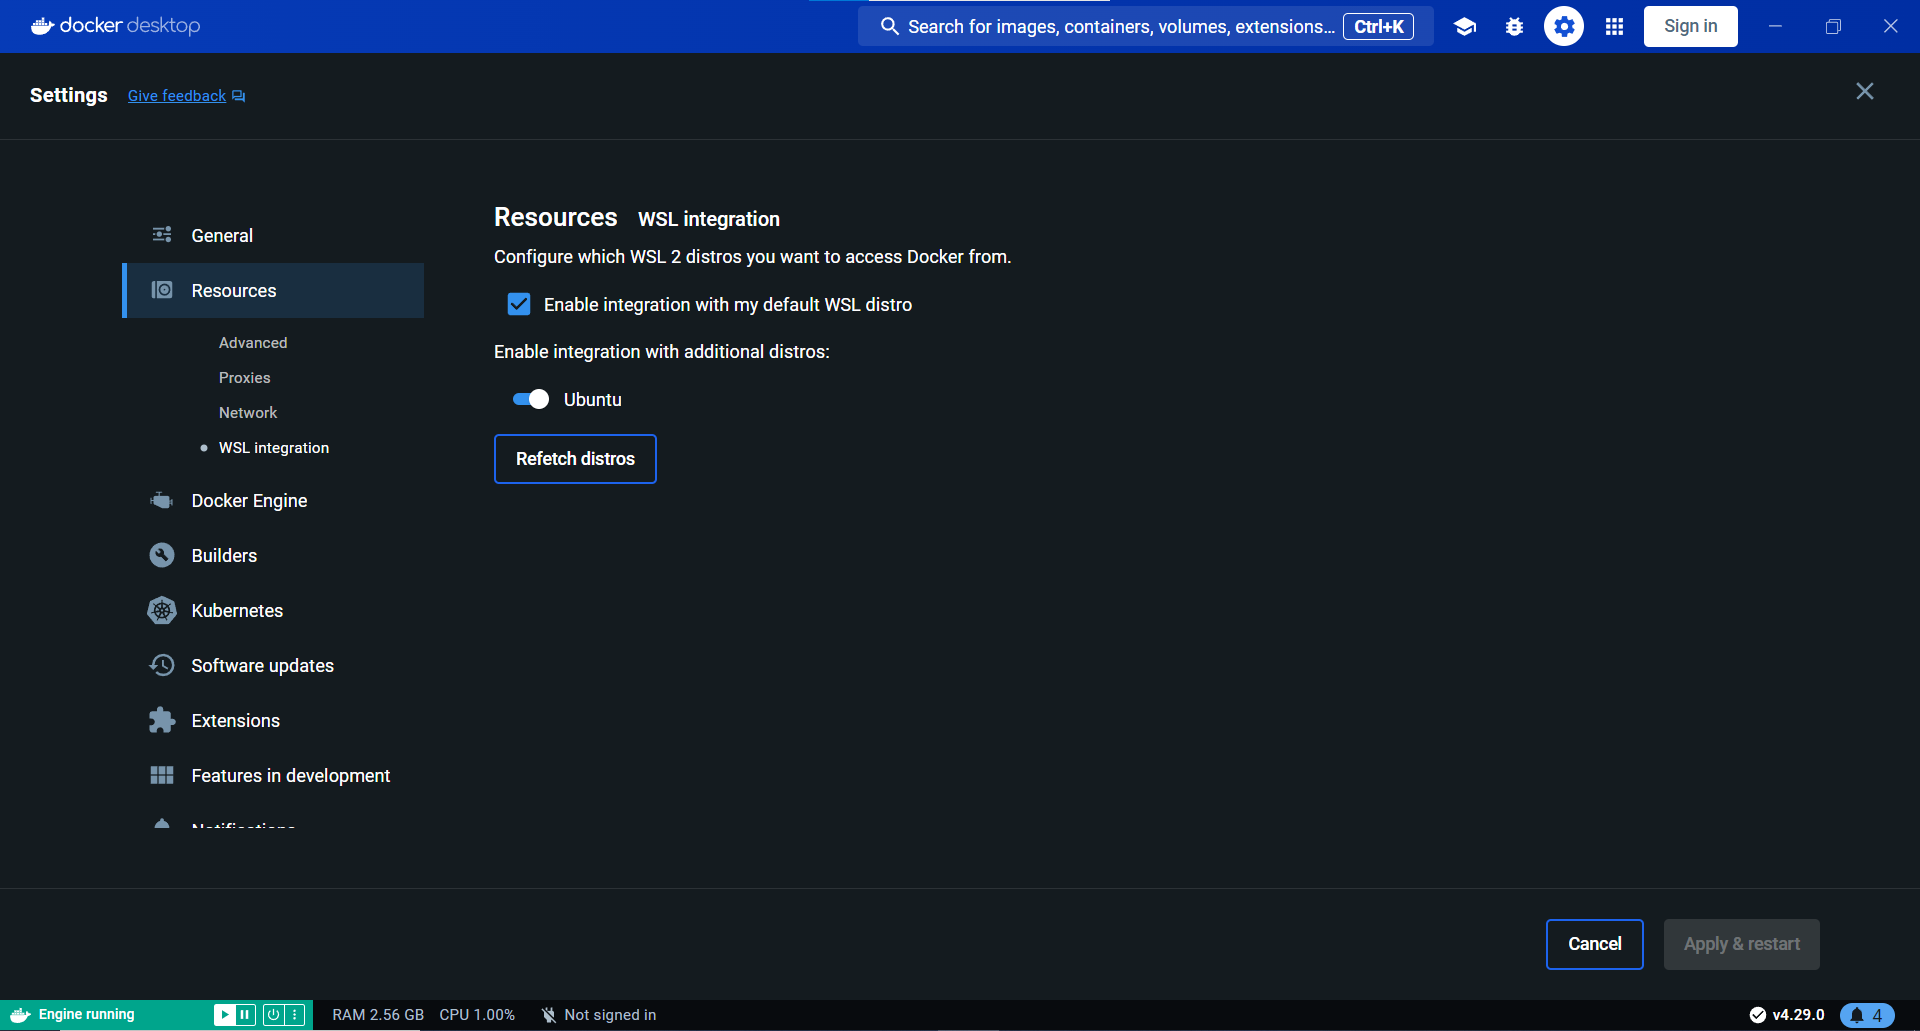
Ensure to use the WSL2 based engine is active in Docker Engine inside Settings > General. It is prefered over Hyper-V as it has better performance.
Step 0: Setup) NVIDIA Acceleration (Optional)
Install the latest NVIDIA Proprietary Drivers on the host Windows.
Make sure to enable CUDA in WSL on the host Windows.
Step 0: Setup) Download Robotics Academy and Robotics Academy Database
Inside a WSL2 terminal execute the following command to download the latest Robotics Academy and Robotics Academy Database images:
docker pull jderobot/robotics-database:latest
docker pull jderobot/robotics-academy:latest
- It is recommended to use the latest image. However, older distributions of Robotics Academy can be found here.
Step 1) Launch Robotics Academy
You must run these commands inside a WSL2 Terminal (e.g., Ubuntu). Do NOT use PowerShell or Command Prompt. Hardware acceleration is enabled automatically.
- First launch the Robotics Academy Database
docker run --hostname my-postgres --name academy_db -d\
    -e POSTGRES_DB=academy_db \
    -e POSTGRES_USER=user-dev \
    -e POSTGRES_PASSWORD=robotics-academy-dev \
    -e POSTGRES_PORT=5432 \
    -d -p 5432:5432 \
    jderobot/robotics-database:latest
- Then launch Robotics Academy
docker run --rm -it $(nvidia-smi >/dev/null 2>&1 && echo "--gpus all -v /usr/lib/wsl:/usr/lib/wsl -e LD_LIBRARY_PATH=/usr/lib/wsl/lib") $([ -e /dev/dri ] && echo "--device /dev/dri") -p 6080-6090:6080-6090 -p 7163:7163 -p 7164:7164 --link academy_db jderobot/robotics-academy:latest
Step 2) Use Robotics Academy
Go to the section How to use and perform the exercises?
3. Robotics Academy on Linux
Step 0: Setup) Install Docker support: Docker engine
Please download Docker Engine following the official documentation.
Step 0: Setup) NVIDIA Acceleration (Optional)
Install the latest NVIDIA Proprietary Drivers following the official documentation.
Install the NVIDIA Container Toolkit following the official documentation.
Step 0-1: Automatic)
The following command will donwload Robotics Academy and Robotics Academy Database and launch them, so if you are using this step you may skip the next two ones.
curl -s https://raw.githubusercontent.com/JdeRobot/RoboticsAcademy/humble-devel/scripts/run_academy.sh | sudo bash
Step 0: Setup) Download Robotics Academy and Robotics Academy Database
Execute the following command to download the latest Robotics Academy and Robotics Academy Database images:
docker pull jderobot/robotics-database:latest
docker pull jderobot/robotics-academy:latest
- It is recommended to use the latest image. However, older distributions of Robotics Academy can be found here.
Step 1) Launch Robotics Academy
You must run these commands. Hardware acceleration is enabled automatically, prioritizing NVIDIA > Intel > AMD > CPU.
If you are using NVIDIA make sure to have follow the Step 0: Setup) NVIDIA Acceleration.
- First launch the Robotics Academy Database
docker run --hostname my-postgres --name academy_db -d\
    -e POSTGRES_DB=academy_db \
    -e POSTGRES_USER=user-dev \
    -e POSTGRES_PASSWORD=robotics-academy-dev \
    -e POSTGRES_PORT=5432 \
    -d -p 5432:5432 \
    jderobot/robotics-database:latest
- Then launch Robotics Academy
docker run --rm -it $(nvidia-smi >/dev/null 2>&1 && echo "--gpus all") --device /dev/dri -p 6080-6090:6080-6090 -p 7163:7163 -p 7164:7164 --link academy_db jderobot/robotics-academy:latest
Step 2) How to use and perform the exercises?
Go to the section How to use and perform the exercises?
4. Robotics Academy on MacOs
Step 0: Setup) Install Docker support: Docker Desktop
Please download Docker Desktop following the official documentation.
Make sure to enable “Use Rosetta for x86_64/amd64 emulation” on Apple Silicon in Settings > General. Please look at the attached image for reference.
Step 0: Setup) Download Robotics Academy and Robotics Academy Database
Execute the following command to download the latest Robotics Academy and Robotics Academy Database images:
docker pull jderobot/robotics-database:latest
docker pull jderobot/robotics-academy:latest
- It is recommended to use the latest image. However, older distributions of Robotics Academy can be found here.
Step 1) Launch Robotics Academy
Run the following commands.
- First launch the Robotics Academy Database
docker run --hostname my-postgres --name academy_db --platform linux/amd64 -d\
    -e POSTGRES_DB=academy_db \
    -e POSTGRES_USER=user-dev \
    -e POSTGRES_PASSWORD=robotics-academy-dev \
    -e POSTGRES_PORT=5432 \
    -d -p 5432:5432 \
    jderobot/robotics-database:latest
- Then launch Robotics Academy
docker run --rm -it --platform linux/amd64 -p 6080-6090:6080-6090 -p 7163:7163 -p 7164:7164 jderobot/robotics-academy:latest
Step 2) How to use and perform the exercises?
Go to the section How to use and perform the exercises?
5. How to use and perform the exercises?
-
On the local machine navigate to 127.0.0.1:7164/ in the browser and choose the desired exercise.
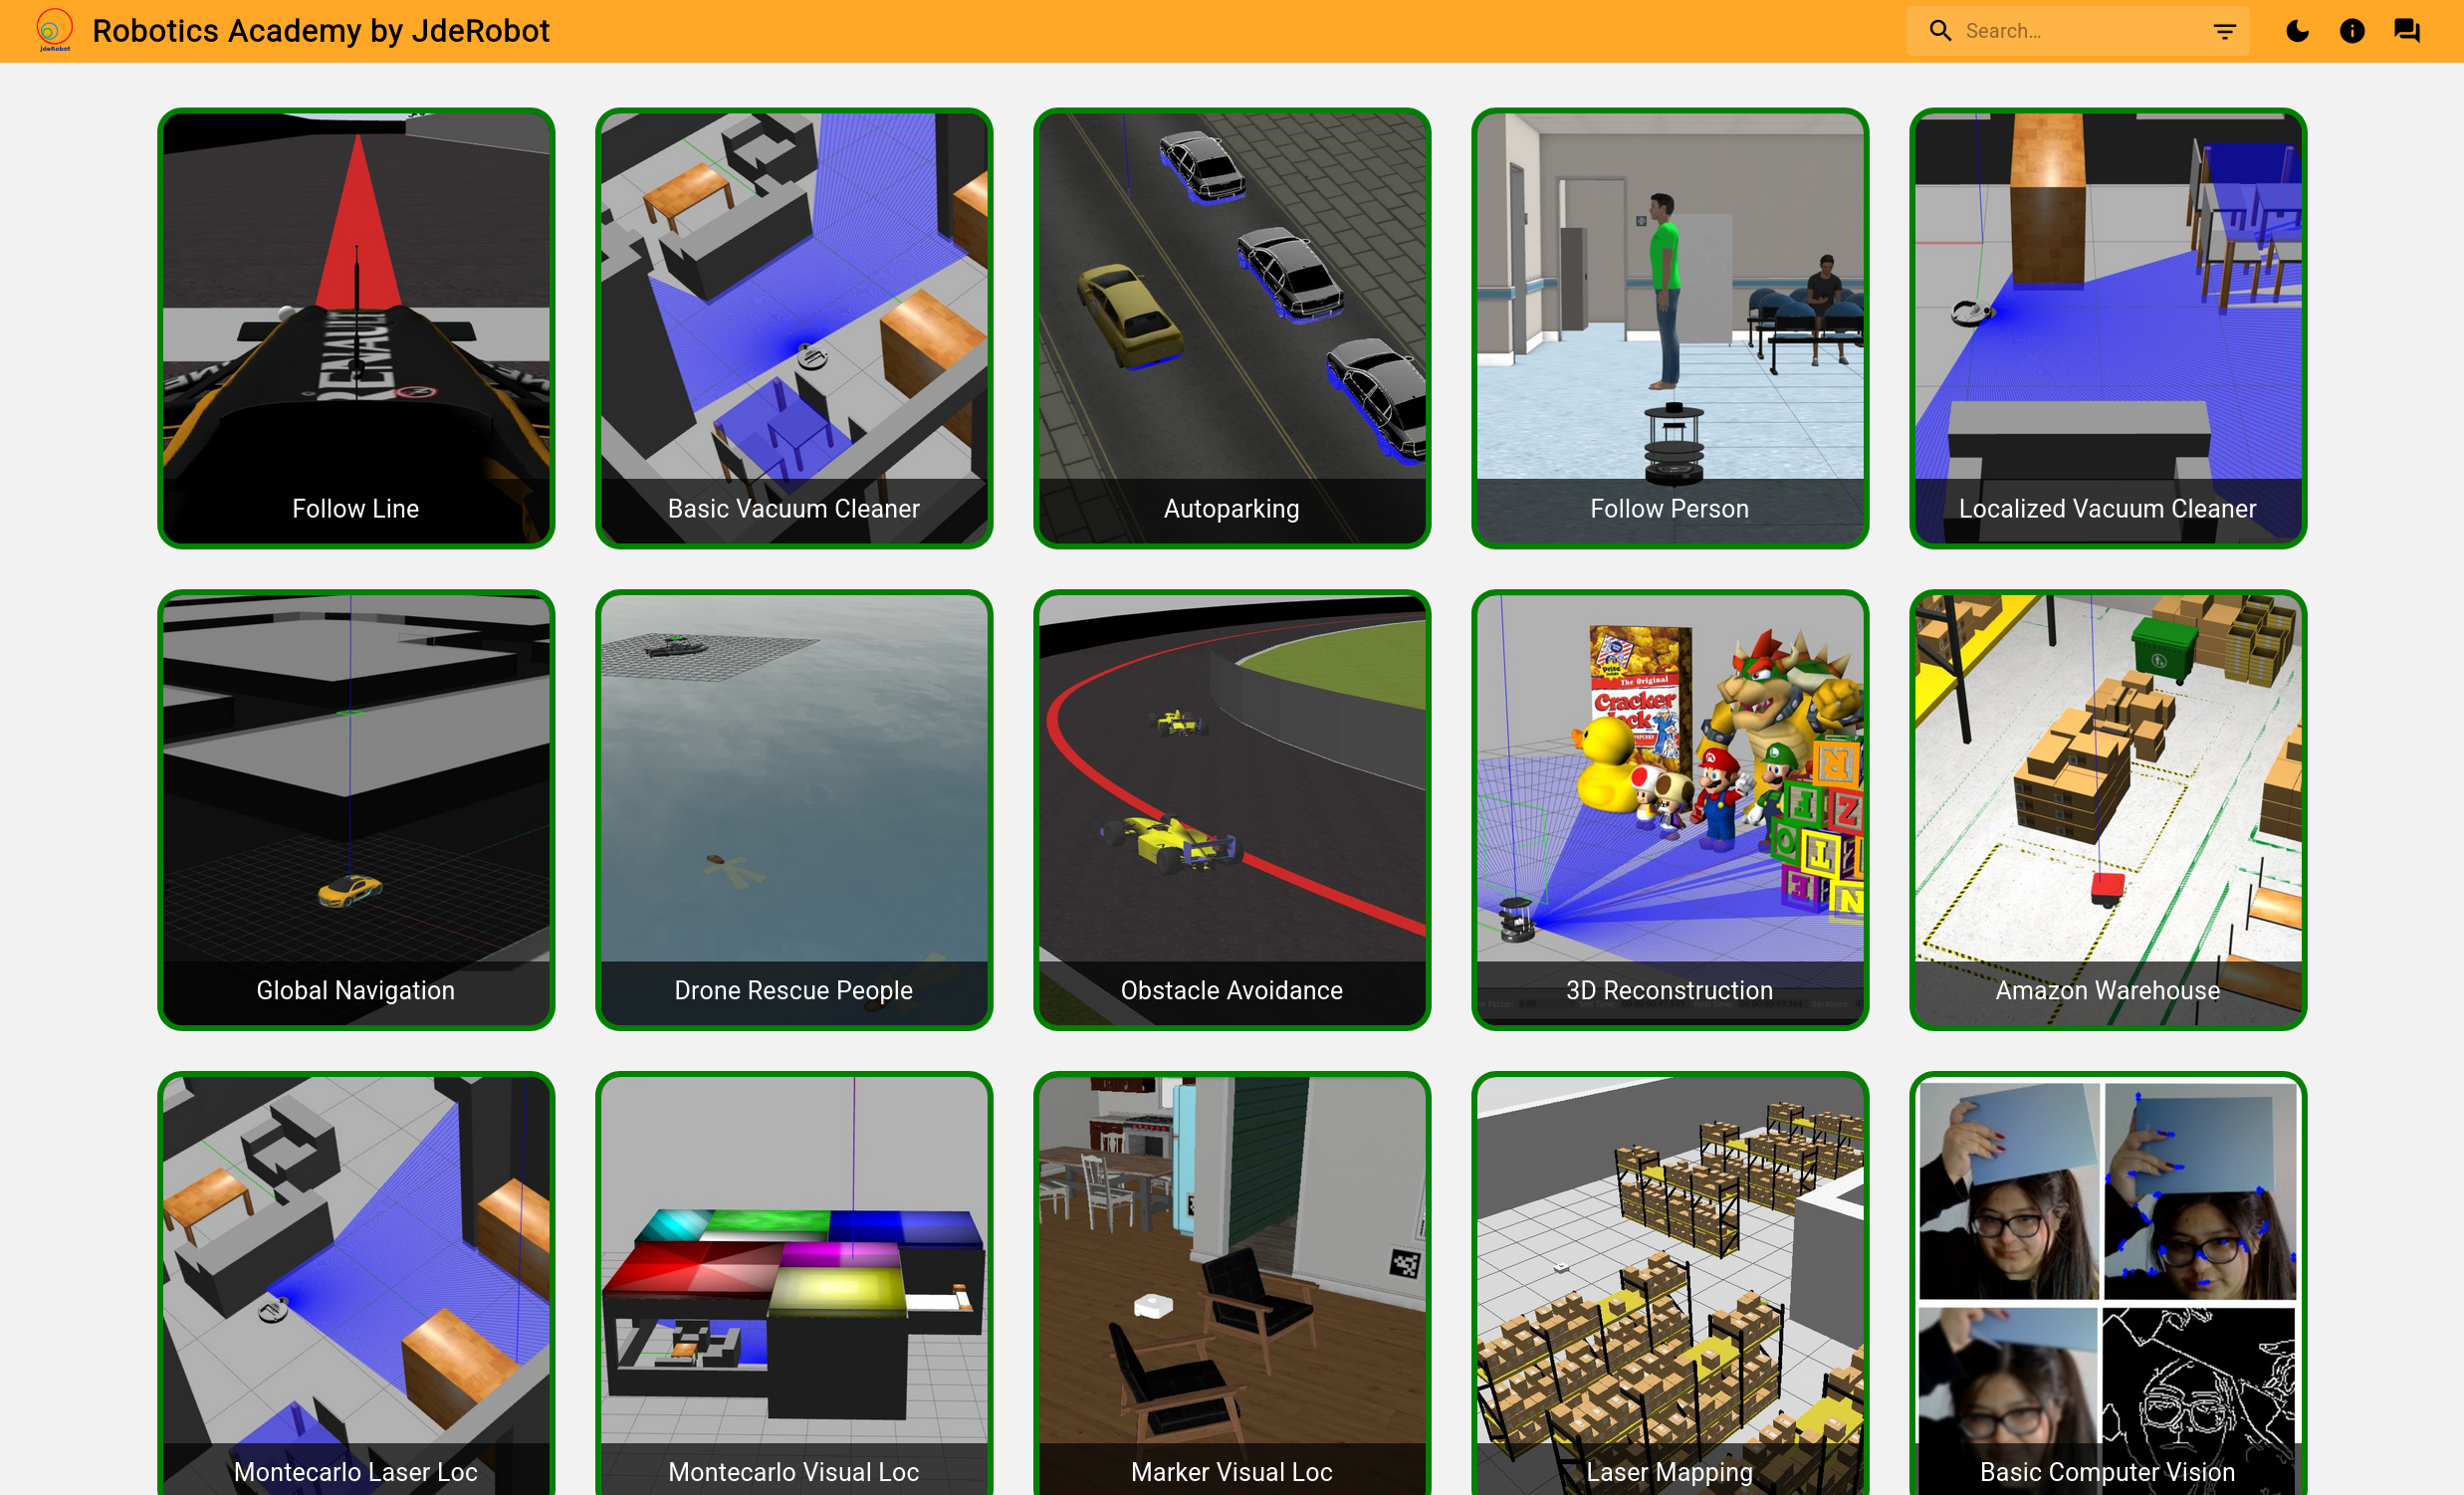
-
Click on the exercise you want to work with.
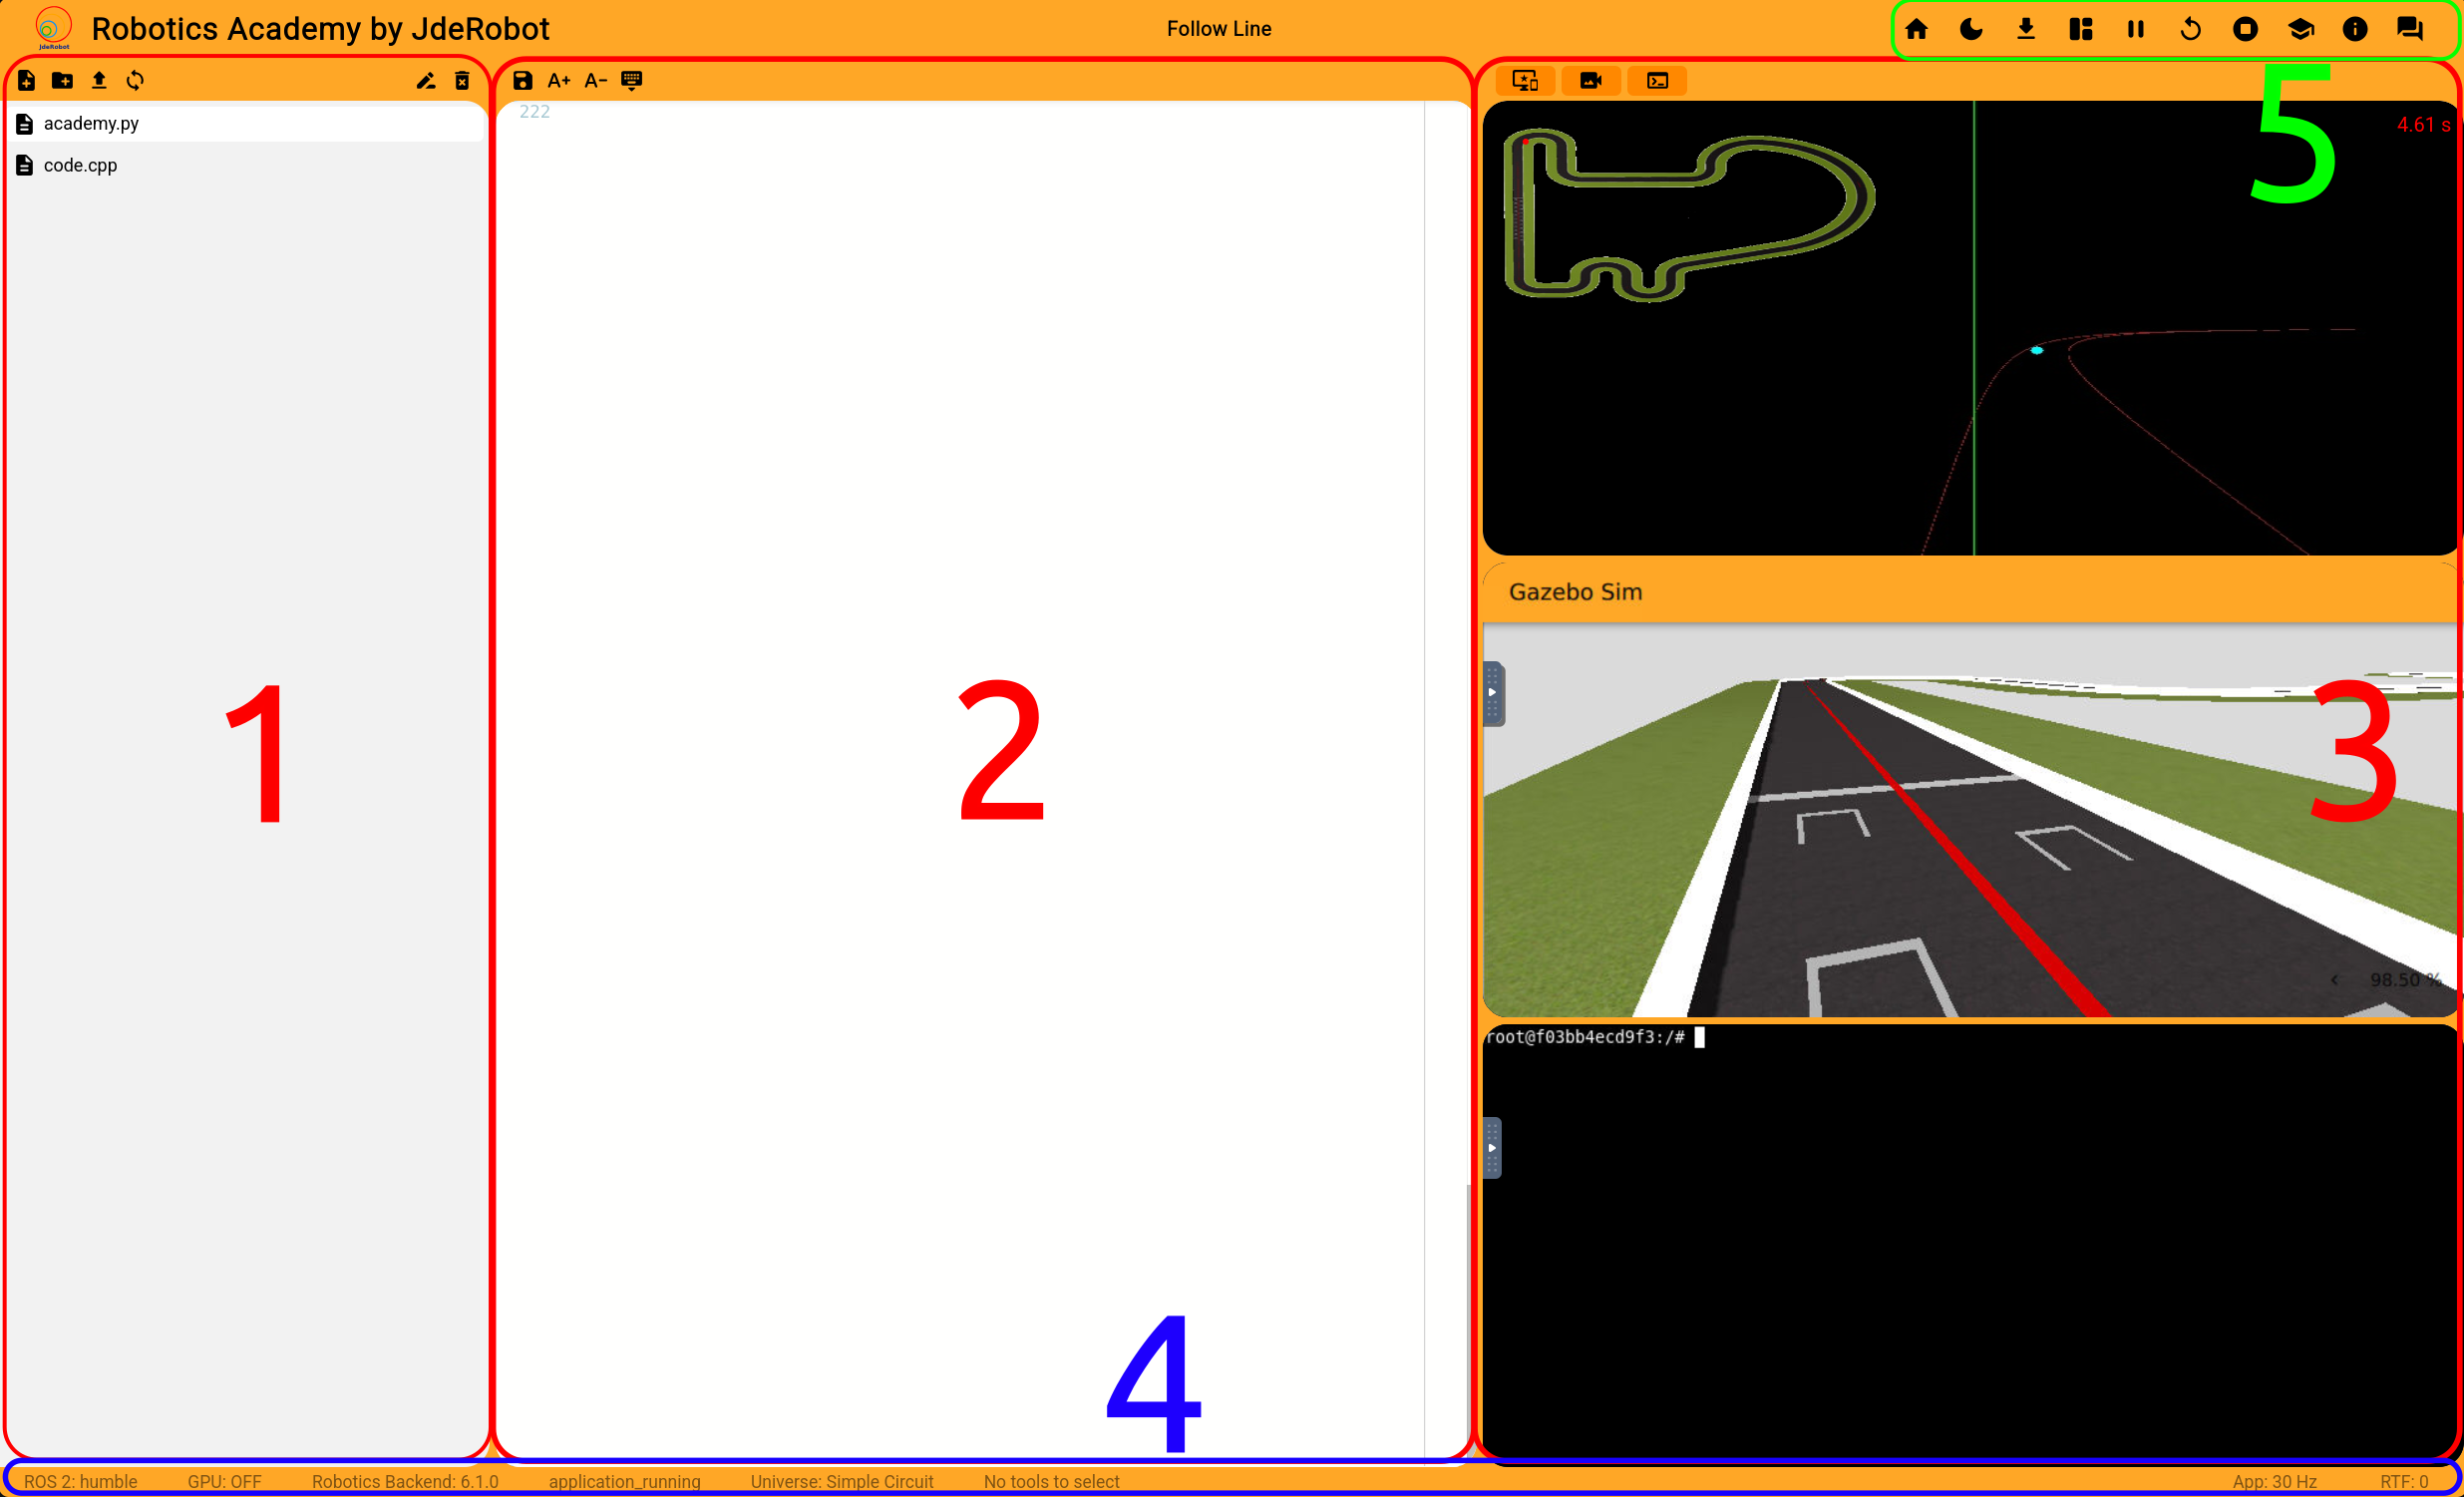
- Let’s take a look to the exercise page:
- Explorer: File explorer for your project. Create, rename, delete and upload files and folders. Can be collapsed
-
Editor: Here you can write your code to solve the exercise. When you’re done, it’s sent to the container with the
startbutton. The current file opened will be the entrypoint of your application. - Tools or viewers: There are 6 possible viewers (not all of them are available in each exercise) that can be collapsed and resized. If there are multiple conflicting ones you may select your prefered one at the tools menu in the status bar.
- WebGUI: displays information from the exercise and allows the user to show debug information from the application code
- Webcam: connects to the user webcam and send images to the application. Cannot be used as the same time as “Local video”
- Local video: allows the user to send frames from the video as images to the application. Cannot be used as the same time as “Webcam”
- Simulator VNC: VNC display showing the simulation
- RVIZ VNC: VNC display running the RVIZ application
- Console VNC: VNC display running a console connected to the application
- Status Bar: Shows information related to the status of the conexion to the Robotics Backend (version, status, ros2 version, gpu) and execution (Real time factor or RTF, application frequency or App) . Also has the menus for tool and universe selection.
- Universe Menu: Some exercises have multiple universes to test your code. Clicking on this button, a list of the universes appears and you can choose whichever you want. Some exercises may not have any available
- Tool Menu: Some exercises have conflicting tools. Clicking on this button, a list of the tools appears and you can choose whichever you want
- Menu Controls: Has controls related to the application execution and others for exiting or showing more information. From right to left they are:
- Home: returns to the main page
- Theme: changes the theme between dark and light
- Download: downloads all the user files in the exercise
- Layout: allows to toggle between 3 different layouts: only show editor, only show viewers and show both
- Play / Pause: To send your code into the docker container, you must use the start button. This will load you’re entire code and execute it using the current open file as the entrypoint. If the simulation is running, it will be replaced with the
pausebutton, which pauses the simulation - Restart: stops the simulation and returns it to its initial state
- Terminate Universe: stops the simulation and closes the current universe
- Documentation: here you can find important info such as implemented methods, the objective of the exercise, etc…
- Info: it will open this user guide
- Forum: here is the best place to ask question about different subjects
- On the exercise you’ll select a world on which you want to resolve the exercise. Then you’ll write the code solution in the text editor and launch it with the start button. You can pause the simulation whenever you want and check if it is executing effectively with RTF visor. At the end you can save your code or load it to resume it whenever you want.
5. Reference execution performance data: Outdated
In this section, various data tables will be provided showing the performance cost of each RoboticsBackend exercise on different PCs, both running without GPU acceleration and with GPU acceleration. The values collected will include the % of CPU usage, the % of GPU usage (if is running with GPU acceleration), the RTF of Gazebo and the FPS of Gazebo.
No GPU Acceleration
Linux
SO: Ubuntu 22.04 LTS, RAM: 8 GB, CPU: Intel Core i7-7700HQ (4 cores)
(Average Percentages up to 100%)
| Gazebo’s RTF | Gazebo’s FPS | % CPU usage | |
|---|---|---|---|
| Follow Line | 0.44 | 7 | 98% |
| Vacuum Cleaner | 0.95 | 10 | 70% |
| Autoparking | 0.82 | 3 | 78% |
| Follow Person | 0.98 | 3 | 99% |
| Localized Vacuum Cleaner | 0.97 | 12 | 85% |
| Global Navigation | 0.38 | 7 | 97% |
| Rescue People | 0.92 | 6 | 95% |
| Obstacle Avoidance | 0.44 | 4 | 94% |
| 3D Reconstruction | 0.70 | 6 | 91% |
| Amazon Warehouse | 0.70 | 2 | 99% |
| Montecarlo Laser Localized | 0.95 | 11 | 88% |
Windows
SO: Windows 11, RAM: 16 GB, CPU: Intel Core i5-9400F (6 cores)
(Average Percentages up to 100%)
| Gazebo’s RTF | Gazebo’s FPS | % CPU usage | |
|---|---|---|---|
| Follow Line | 0.13 | 3 | 79% |
| Vacuum Cleaner | 0.89 | 7 | 74% |
| Autoparking | 0.80 | 3 | 77% |
| Follow Person | 0.68 | 4 | 79% |
| Localized Vacuum Cleaner | 0.80 | 7 | 77% |
| Global Navigation | 0.73 | 7 | 78% |
| Rescue People | 0.59 | 5 | 79% |
| Obstacle Avoidance | 0.29 | 3 | 80% |
| 3D Reconstruction | 0.56 | 3 | 79% |
| Amazon Warehouse | 0.56 | 2 | 79% |
| Montecarlo Laser Localized | 0.80 | 9 | 76% |
SO: Windows 11, RAM: 16 GB, CPU: Intel Core i5-13600KF (14 cores)
(Average Percentages up to 100%)
| Gazebo’s RTF | Gazebo’s FPS | % CPU usage | |
|---|---|---|---|
| Follow Line | 0.89 | 30 | 78% |
| Vacuum Cleaner | 1.00 | 19 | 51% |
| Autoparking | 0.98 | 8 | 52% |
| Follow Person | 0.99 | 18 | 85% |
| Localized Vacuum Cleaner | 0.99 | 37 | 60% |
| Global Navigation | 0.88 | 40 | 80% |
| Rescue People | 0.88 | 30 | 72% |
| Obstacle Avoidance | 0.91 | 12 | 70% |
| 3D Reconstruction | 0.97 | 11 | 65% |
| Amazon Warehouse | 0.92 | 7 | 90% |
| Montecarlo Laser Localized | 0.98 | 38 | 70% |
MacOS
SO: MacOS Sonoma 14.5, RAM: 8 GB, CPU: Apple M1 (8 cores)
(Average Percentages up to 800%)
| Gazebo’s RTF | Gazebo’s FPS | % CPU usage | |
|---|---|---|---|
| Follow Line | 0.57 | 20 | 620% |
| Vacuum Cleaner | 0.50 | 15 | 400% |
| Autoparking | 0.47 | 5 | 530% |
| Follow Person | 0.78 | 13 | 650% |
| Localized Vacuum Cleaner | 0.45 | 20 | 500% |
| Global Navigation | 0.60 | 10 | 650% |
| Rescue People | - | - | - |
| Obstacle Avoidance | 0.57 | 3 | 600% |
| 3D Reconstruction | 0.46 | 4 | 550% |
| Amazon Warehouse | 0.37 | 3 | 660% |
| Montecarlo Laser Localized | 0.44 | 18 | 500% |
Intel GPU Acceleration
Linux
No data yet.
Windows
No data yet.
MacOS
No data yet.
Nvidia GPU Acceleration
Linux
SO: Ubuntu 22.04.4 LTS, RAM: 16 GB, CPU: AMD Ryzen 5 7535HS (6 cores), GPU: NVIDIA GeForce RTX 3050 Ti:
(Average Percentages up to 100%)
| Task | Gazebo’s RTF | Gazebo’s FPS | % CPU Usage | % GPU Usage |
|---|---|---|---|---|
| Follow Line | 0.99 | 62 | 62% | 8% |
| Vacuum Cleaner | 1.0 | 62 | 52% | 7% |
| AutoParking | 0.97 | 37 | 54% | 14% |
| Follow Person | 1.0 | 42 | 70% | 15% |
| Localized Vacuum Cleaner | 1.0 | 62 | 65% | 28% |
| Global Navigation | 1.0 | 62 | 53% | 6% |
| Rescue People | 1.0 | 62 | 65% | 16% |
| Obstacle Avoidance | 0.99 | 60 | 65% | 5% |
| 3D Reconstruction | 0.99 | 58 | 66% | 9% |
| Amazon Warehouse | 1.0 | 60 | 54% | 5% |
| Montecarlo Laser Localized | 1.0 | 62 | 53% | 16% |
Windows
SO: Windows 11, RAM: 16 GB, CPU: Intel Core i5-9400F (6 cores), GPU: NVIDIA GeForce GTX 1660
(Average Percentages up to 100%)
| Gazebo’s RTF | Gazebo’s FPS | % CPU usage | % GPU usage | |
|---|---|---|---|---|
| Follow Line | 0.42 | 14 | 73% | 5% |
| Vacuum Cleaner | 0.95 | 10 | 55% | 5% |
| Autoparking | 0.85 | 5 | 65% | 8% |
| Follow Person | 0.95 | 22 | 67% | 3% |
| Localized Vacuum Cleaner | 0.93 | 15 | 68% | 5% |
| Global Navigation | 0.73 | 9 | 68% | 7% |
| Rescue People | 0.49 | 8 | 77% | 10% |
| Obstacle Avoidance | 0.25 | 3 | 75% | 4% |
| 3D Reconstruction | 0.68 | 9 | 77% | 8% |
| Amazon Warehouse | 0.67 | 2 | 78% | 4% |
| Montecarlo Laser Localized | 0.85 | 12 | 73% | 18% |
SO: Windows 11, RAM: 16 GB, CPU: Intel Core i5-13600KF (14 cores), GPU: NVIDIA GeForce RTX 4060
(Average Percentages up to 100%)
| Gazebo’s RTF | Gazebo’s FPS | % CPU usage | % GPU usage | |
|---|---|---|---|---|
| Follow Line | 0.88 | 41 | 75% | 3% |
| Vacuum Cleaner | 1.00 | 22 | 43% | 4% |
| Autoparking | 0.98 | 15 | 55% | 5% |
| Follow Person | 1.00 | 10 | 70% | 10% |
| Localized Vacuum Cleaner | 0.99 | 45 | 56% | 6% |
| Global Navigation | 0.88 | 60 | 70% | 8% |
| Rescue People | 1.00 | 62 | 60% | 9% |
| Obstacle Avoidance | 0.90 | 16 | 73% | 4% |
| 3D Reconstruction | 0.98 | 10 | 72% | 8% |
| Amazon Warehouse | 0.94 | 7 | 87% | 4% |
| Montecarlo Laser Localized | 0.99 | 44 | 52% | 12% |
MacOS
No data yet.