Autoparking
Goal
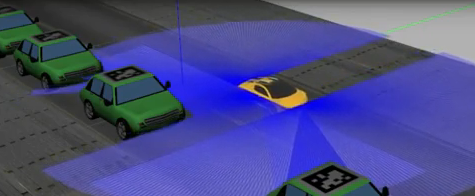
The objective of this exercise is to implement the logic of a navigation algorithm for an automated vehicle. The vehicle must find a parking space and park properly.
Frequency API
Python
import Frequency- to import the Frequency library class. This class contains the tick function to regulate the execution rate.Frequency.tick(ideal_rate)- regulates the execution rate to the number of Hz specified. Defaults to 50 Hz.
C++
#include "Frequency.hpp"- to import the Frequency library class. This class contains the tick function to regulate the execution rate.Frequency freq = Frequency();- to instanciate the Frequency class.freq.tick(ideal_rate);- regulates the execution rate to the number of Hz specified. Defaults to 50 Hz.
Robot API
This exercise now supports ROS 2-direct implementation in addition to the original HAL-based approach. Below you’ll find the details for both options.
HAL-based Implementation
Python
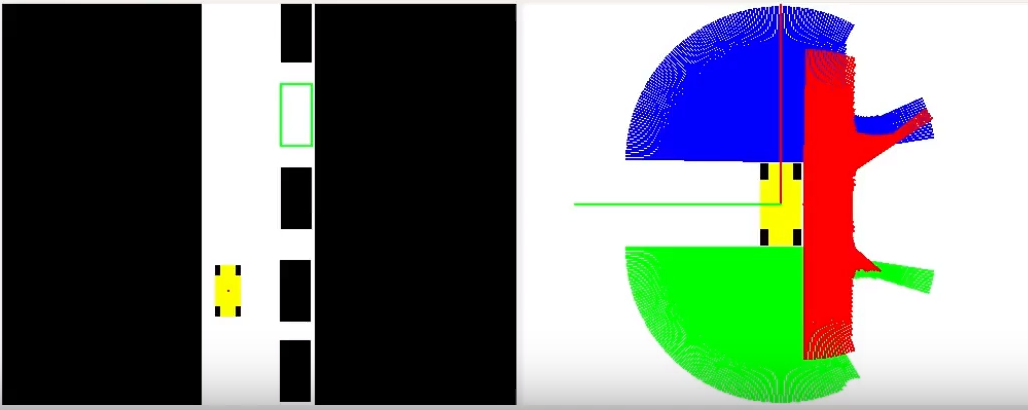
import HAL- to import the HAL (Hardware Abstraction Layer) library class. This class contains the functions that send and receive information to and from the Hardware (Gazebo).import WebGUI- to import the WebGUI (Web Graphical User Interface) library class. This class contains the functions used to view the debugging information, like image widgets.HAL.getPose3d()- to get all the position information.HAL.getPose3d().x- to get the position of the robot (x coordinate).HAL.getPose3d().y- to get the position of the robot (y coordinate).HAL.getPose3d().yaw- to get the orientation of the robot with regarding the mapHAL.getFrontLaserData()- to obtain the front laser sensor data. It is composed of 180 pairs of values: (0-180º distance in millimeters)HAL.getRightLaserData()- to obtain the right laser sensor data. It is composed of 180 pairs of values: (0-180º distance in millimeters)HAL.getBackLaserData()- to obtain the back laser sensor data. It is composed of 180 pairs of values: (0-180º distance in millimeters)HAL.setV()- to set the linear speed.HAL.setW()- to set the angular velocity.
C++
#include "HAL.hpp"- to import the HAL (Hardware Abstraction Layer) library class. This class contains the functions that send and receive information to and from the Hardware (Gazebo).#include "WebGUI.hpp"- to import the WebGUI (Web Graphical User Interface) library class. This class contains the functions used to view the debugging information, like image widgets.HAL::get_pose3d();- Returns the current pose as aHAL::Pose3dstruct with fieldsx,y(in m) andyaw(in rad).HAL::get_front_laser_data();- Returns the front laser sensor data as aHAL::LaserDatastruct (values in m, 0-180º).HAL::get_right_laser_data();- Returns the right laser sensor data as aHAL::LaserDatastruct (values in m, 0-180º).HAL::get_back_laser_data();- Returns the back laser sensor data as aHAL::LaserDatastruct (values in m, 0-180º).HAL::get_lidar_data();- Returns the 3D LiDAR point cloud data.HAL::set_v(velocity);- to set the linear speed.HAL::set_w(velocity);- to set the angular velocity.
In order to use the HAL-based controls you must include the following lines:
#include "HAL.hpp"
#include "WebGUI.hpp"
#include "Frequency.hpp"

void exercise() {
    Frequency freq = Frequency();
    // Enter sequential code!

    while (true)
    {
        // Enter iterative code!
        freq.tick();


    }
}
ROS 2-direct Implementation
Use standard ROS 2 topics for direct communication with the simulation.
-
/prius_autoparking/cmd_vel- Publish to this topic to set both linear and angular velocities. Message type:geometry_msgs/msg/Twist -
/prius_autoparking/odom- Subscribe to this topic to receive the car odometry. Message type:nav_msgs/msg/Odometry -
/prius_autoparking/scan_front- Subscribe to this topic to receive the front laser scan. Message type:sensor_msgs/msg/LaserScan -
/prius_autoparking/scan_side- Subscribe to this topic to receive the right-side laser scan. Message type:sensor_msgs/msg/LaserScan -
/prius_autoparking/scan_back- Subscribe to this topic to receive the rear laser scan. Message type:sensor_msgs/msg/LaserScan -
/prius_autoparking/pc2- Subscribe to this topic to receive 3D LiDAR data. Message type:sensor_msgs/msg/PointCloud2
Python
Note: Ensure this import is included in your script to access the Web GUI functionalities.
import WebGUI - to enable the Web GUI for visualizing camera images.
To have frequency control you need to use standard ROS 2 mechanisms to manage loop timing:
rclpy.spin()- Event-driven execution using callbacks.rclpy.spin_once()- Single-step processing, often with custom timers.rclpy.Rate()- Loop-based frequency control.
Note
WebGUI already initializes rclpy internally, so this should be taken into account when building a direct ROS 2 solution.
C++
In order to use direct ros controls you must include the following lines:
#ifndef USER_NODE
#define USER_NODE

#include "rclcpp/rclcpp.hpp"

class UserNode : public rclcpp::Node {
  // Your class
};

#endif
You must define USER_NODE and a UserNode node class.
To have frequency control you may use a timer and a control function as follows:
  UserNode() : Node("user_node")
  {
    // More subscribers and publishers
    timer_ = create_wall_timer(100ms, std::bind(&UserNode::control_cycle, this));
  };

// More Code

  void control_cycle(){
    // Your function
  };
Laser attributes
HAL.getFrontLaserData(), HAL.getRightLaserData() and HAL.getBackLaserData() returns an instance of a Class with the following attributes:
minAngle- Start angle of the scan [rad]maxAngle- End angle of the scan [rad]minRange- minimum range value [m]maxRange- maximum range value [m]values- A list of 180 measurements [m] (Note: values < minRange or > maxRange should be discarded)
Illustrations
Videos
Contributors
- Contributors: Vanessa Fernández Martínez, Javier Izquierdo.
- Maintained by Vanessa Fernández Martínez, Javier Izquierdo.