Machine Vision
Versions to run the exercise
Currently, there are 2 ways to run this exercise (ROS 2 + MoveIt 2):
- Web Templates (recommended) — run via RoboticsAcademy Docker and use the in-browser editor.
- ROS 2 Node Templates — for local development with
colconworkspaces.
The instructions for both are provided below.
Goal
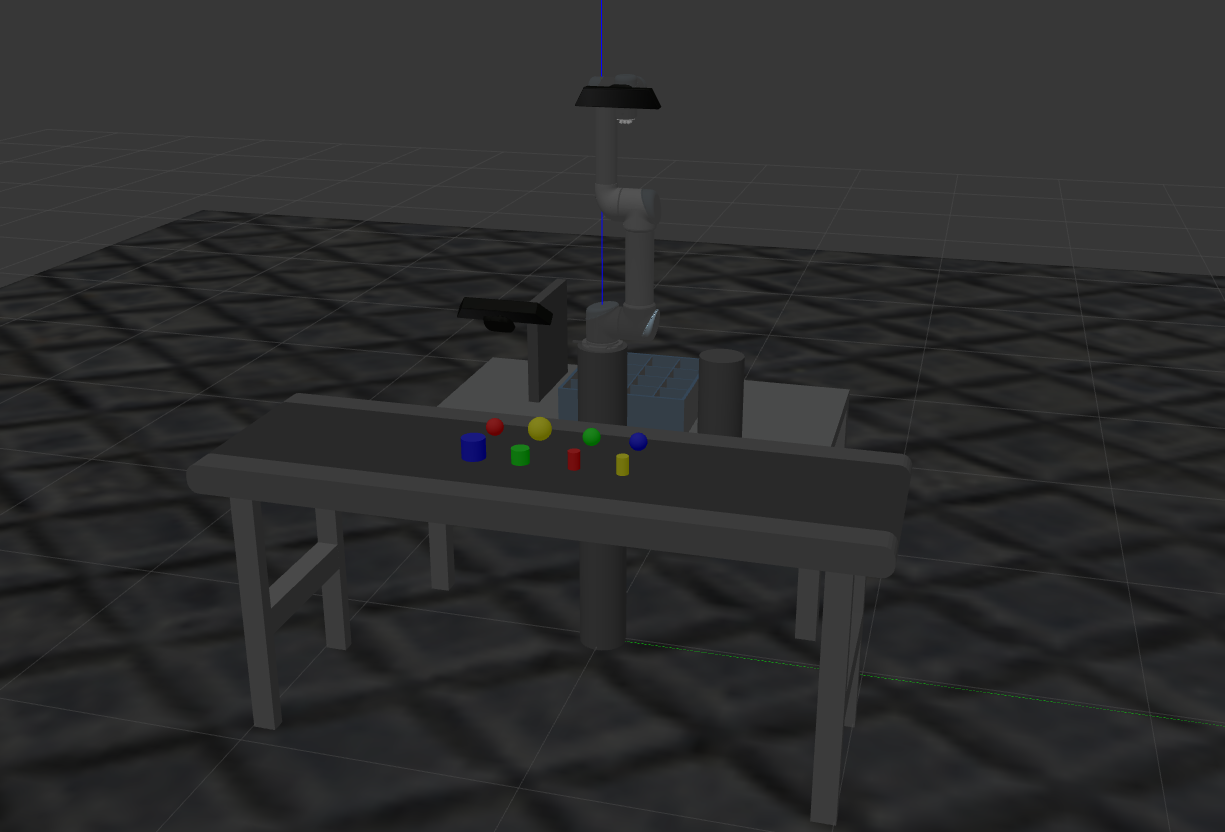
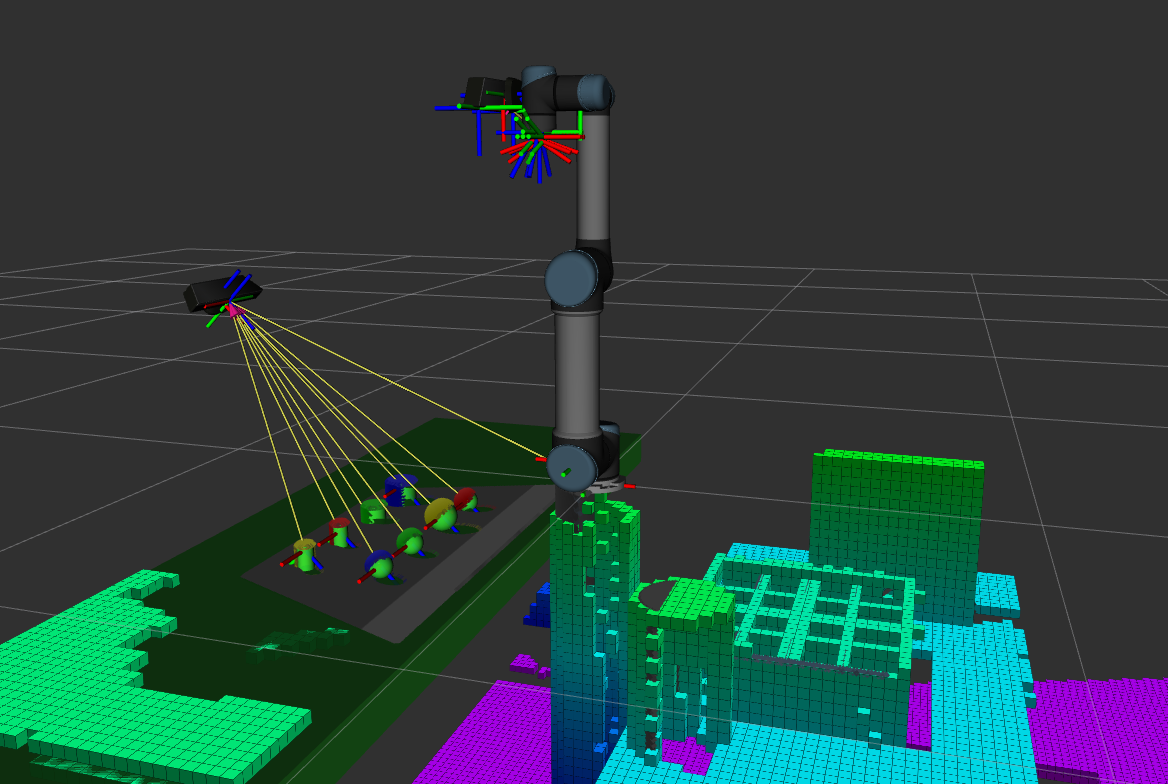
The goal of this exercise is to learn how to use vision to assist an industrial robot by detecting known objects and unknown obstacles, then completing a pick‑and‑place task using a robot arm and a two‑finger gripper. Two depth cameras are used (one fixed to the world and another mounted on the robot end effector). The shape, size, and color of the objects are known, but their poses and the surrounding obstacles must be perceived using the cameras.
Installation (Web Templates)
-
Download Docker. Windows users should choose WSL 2 backend if possible (better performance than Hyper‑V).
-
Pull the latest RoboticsBackend image:
docker pull jderobot/robotics-backend:latest -
For optimal performance, allow Docker to use multiple CPU cores (and GPU where applicable).
Enable GPU Acceleration
-
Linux + NVIDIA: install proprietary drivers and VirtualGL, then run:
docker run --rm -it --device /dev/dri -p 7164:7164 -p 2303:2303 -p 1905:1905 -p 8765:8765 -p 6080:6080 -p 1108:1108 jderobot/robotics-backend:latest ./start.sh -
Windows (WSL 2): GPU for Docker is experimental; see the official instructions here.
How to perform the exercise (Web Templates)
-
Start a new container and keep it running (hardware‑accelerated command above if needed). Otherwise:
docker run --rm -it -p 7164:7164 -p 2303:2303 -p 1905:1905 -p 8765:8765 -p 6080:6080 -p 1108:1108 jderobot/robotics-backend:latest ./start.sh -
Open your browser at 127.0.0.1:7164/ and select the exercise.
-
Click Connect and wait for the
Connection Establishedalert. The button will show Connected. You can use the exercise after this.
Where to insert the code?
In the launched webpage, type your code in the text editor:
import HAL
# Enter sequential code!

while True:
    # Enter iterative code!
Using the Interface
- Control Buttons: Play sends your code to the robot; Stop halts it; Save/Load manage local files; Reset resets the simulation (robot pose, scene elements where applicable).
- Brain and GUI Frequency: Shows measured vs target loop rate for the iterative code (
while True:). Adjust target to avoid overload. - RTF (Real Time Factor): 1.0 means real time. Lower values imply slower simulation (depends on your hardware).
- Pseudo Console: Displays printouts and errors from your code. Use
print()for debugging.
HAL API for Gazebo 11 (classic)
The following is the updated student API for the ROS 2 migration. It supersedes the old ROS 1
pickup/placehelpers. Use these calls directly in your solution.
To use this HAL API, you need to import the HAL module:
import HAL
Robot information
HAL.get_TCP_pose()→(xyz, ypr)(position, rotation)HAL.get_Joint_states()→[j1..j6](rotation)
Kinematics
HAL.MoveAbsJ(absolute_joints, rel_speed, wait_time)— move to absolute joint angles (deg).HAL.MoveSingleJ(joint_id, relative_angle_deg, rel_speed, wait_time)— increment one joint.HAL.MoveJoint(absolute_XYZ, absolute_YPR, rel_speed, wait_time)— PTP to absolute pose.HAL.MoveLinear(absolute_XYZ, absolute_YPR, rel_speed, wait_time)— linear motion to absolute pose.HAL.MoveRelLinear(increment_XYZ, rel_speed, wait_time)— linear ΔXYZ.HAL.MoveRelReor(increment_YPR, rel_speed, wait_time)— ΔYaw/Pitch/Roll (deg), position fixed.
Gripper
HAL.GripperSet(relative_closure, wait_time)— 0 = fully open, 100 = fully closed. A value of0auto‑detaches any grasped object in simulation.HAL.attach(object_name)— attach a simulated object to the gripper (instant in sim).HAL.detach()— detach any attached objects.
Vision & Environment
-
HAL.start_color_filter(color, rmax, rmin, gmax, gmin, bmax, bmin)— start color filter for{"red","green","blue","purple"}with RGB ranges[0..255]. Publishes$(color)_filterand$(color)_filtered_imagetopics. HAL.stop_color_filter(color)— stop that filter.-
HAL.start_shape_filter(color, shape, radius)— on the color‑filtered cloud, detectshape ∈ {"sphere","cylinder"}of approx.radius(m). Publishes$(color)_$(shape)point cloud,$(color)_$(shape)_imagedepth image, and adds a TF frame$(color)_$(shape). HAL.stop_shape_filter(color, shape)— stop shape filter.HAL.get_object_position(object_name)→[x,y,z]orNone— returns the world position of a known object frame (e.g.,"green_cylinder"). A 3 cm Z offset is applied for grasp clearance.HAL.get_object_info(object_name)→(height, width, length, shape, color)HAL.get_target_position(target_name)→geometry_msgs/PointHAL.scan_workspace()— move to a scan pose, trigger sensors, return home.HAL.buildmap()— trigger environment scanning/mapping sequence.
Workspace helpers
HAL.set_home_position(joint_angles_deg)/HAL.get_home_position()HAL.back_to_home()— move home and open gripper.HAL.move_joint_arm(j0, j1, j2, j3, j4, j5)— convenience wrapper.HAL.custom_scan_sequence(list_of_joint6_arrays)— multi‑pose scanning routine.
HAL API for Gazebo Harmonic (Machine Vision)
To use this HAL API, you need to import the HAL_Harmonic module:
import HAL_Harmonic as HAL
This HAL provides robot motion, gripper control, object attachment, workspace scanning, perception filtering, and camera access for the Machine Vision exercise in Gazebo Harmonic.
Robot information
HAL.get_TCP_pose()→(xyz, ypr)- Returns the current Tool Center Point (TCP) pose in world coordinates.
xyz = [x, y, z]in meters.ypr = [yaw, pitch, roll]in degrees.
HAL.get_Joint_states()→[j1..j6]- Returns the current robot joint positions in degrees.
Kinematics
Direct Kinematics
HAL.MoveAbsJ(absolute_joints, speed, wait_time)- Moves the robot to an absolute joint-space configuration.
absolute_joints→ list of 6 joint angles in degrees.speed→ relative speed in range[0.0 - 1.0].wait_time→ delay after execution in seconds.
HAL.MoveSingleJ(joint_number, relative_angle, speed, wait_time)- Moves a single joint by a relative angular increment.
relative_angleis specified in degrees.
Inverse Kinematics
HAL.MoveJoint(abs_xyz, abs_ypr, speed, wait_time)- Point-to-Point (PTP) movement to an absolute Cartesian pose.
abs_xyz = [x, y, z]in meters.abs_ypr = [yaw, pitch, roll]in degrees.- Uses inverse kinematics internally.
HAL.MoveLinear(abs_xyz, abs_ypr, speed, wait_time)- Moves the TCP to an absolute Cartesian pose following a linear trajectory.
- Useful for pick-and-place approach motions.
Relative TCP motion
HAL.MoveRelLinear(relative_xyz, speed, wait_time)- Moves the TCP by a relative Cartesian displacement.
relative_xyz = [dx, dy, dz]in meters.- Orientation remains unchanged.
HAL.MoveRelReor(relative_ypr, speed, wait_time)- Reorients the TCP without changing position.
relative_ypr = [dYaw, dPitch, dRoll]in degrees.
Gripper
In Gazebo Harmonic, the gripper is controlled through the joint trajectory controller. Object grasping and releasing are handled automatically through a custom contact-based attachment system integrated into Gazebo.
HAL.GripperSet(percentage_closure, wait_time)
Closes or opens the two-finger gripper to the closing percentage given in the first argument, adding a final delay in seconds.
- A
percentage_closureof 100 means fully closed. - A
percentage_closureof 0 means fully opened.
When the gripper starts closing (percentage_closure > 5), automatic attachment is enabled. If one of the graspable objects is detected in contact with the gripper fingers, the object is automatically attached to the gripper.
When the gripper is opened (percentage_closure <= 5), automatic attachment is disabled and any currently attached object is automatically detached.
Graspable Objects
The following objects can be automatically grasped and attached:
blue_spherered_spheregreen_spherepurple_spheregreen_cylinderred_cylinderpurple_cylinder
No manual attach or detach commands are required. Grasping and releasing are performed automatically based on gripper state and contact detection.
Vision & Environment
This HAL includes a Perception Manager that handles filtering, workspace scanning, object lookup, and target retrieval.
Color filtering
HAL.start_color_filter(color, rmax, rmin, gmax, gmin, bmax, bmin)- Starts RGB-based color filtering.
- Supported colors:
"red""green""blue""purple"
- RGB values must be in range
[0..255].
HAL.stop_color_filter(color)- Stops a running color filter.
Shape filtering
HAL.start_shape_filter(color, shape, radius)- Starts shape detection over the filtered color cloud.
- Supported shapes:
"sphere""cylinder"
radius→ approximate radius in meters.
HAL.stop_shape_filter(color, shape)- Stops the shape filter.
Object handling
HAL.get_object_position(object_name)→[x, y, z] | None- Returns the Cartesian position of an object.
- Object poses are loaded from the environment model.
HAL.get_object_info(object_name)→(height, width, length, shape, color)- Returns metadata of a known object:
- height
- width
- length
- shape
- color
- Returns metadata of a known object:
HAL.get_target_position(target_name)→geometry_msgs/Point- Returns the world position of a target.
Cameras
This HAL provides two camera streams.
HAL.getImage(camera="hand")- Returns an RGB image from the selected camera.
Supported cameras:
"hand"→ wrist-mounted camera"base"→ fixed base camera
Examples:
img = HAL.getImage("hand")
img = HAL.getImage("base")
Workspace & scanning
HAL.scan_workspace()- Performs a workspace scanning sequence:
- Move robot to scan pose
- Trigger environment scanning
- Wait for acquisition
- Stop scanning
- Return home
- Returns the detected object list.
- Performs a workspace scanning sequence:
HAL.buildmap()- Runs a full environment mapping procedure.
HAL.custom_scan_sequence(scan_positions)- Runs a custom multi-pose scanning sequence.
scan_positions→ list of joint configurations.- Returns merged detected objects.
Workspace helpers
HAL.set_home_position(joint_angles_deg)- Sets a custom robot home position.
HAL.get_home_position()- Returns the current home joint configuration.
HAL.back_to_home()- Moves the robot to the home position and opens the gripper.
Internally executes:
MoveAbsJ(...)
GripperSet(0, ...)
HAL.move_joint_arm(j0, j1, j2, j3, j4, j5)- Convenience wrapper for absolute joint-space motion.
- Equivalent to:
HAL.MoveAbsJ([...], speed, wait_time)
HAL API for C++
#include "HAL.hpp"- to import the HAL (Hardware Abstraction Layer) library class. This class contains the functions that send and receive information to and from the Hardware (Gazebo).#include "WebGUI.hpp"- to import the WebGUI library. Used to display camera images in the browser.
Robot information
HAL::get_TCP_position();- Returns the current TCP position asstd::array<double, 3>[x, y, z] in metres.HAL::get_TCP_orientation();- Returns the current TCP orientation asstd::array<double, 3>[yaw, pitch, roll] in degrees.HAL::get_Joint_states();- Returns the current joint positions asstd::array<double, 6>in degrees.
Direct Kinematics
HAL::MoveAbsJ(joints, speed, wait_time);- Moves the robot to the given angular position for each joint.jointsisstd::array<double, 6>in degrees,speedin [0,1],wait_timein seconds.HAL::MoveSingleJ(joint_number, relative_angle, speed, wait_time);- Moves a single joint by a relative angular increment.joint_numberin [1,6], angle in degrees.
Inverse Kinematics
HAL::MoveJoint(xyz, ypr, speed, wait_time);- Moves the TCP to an absolute Cartesian pose.xyzisstd::array<double, 3>in metres,yprin degrees.HAL::MoveLinear(xyz, ypr, speed, wait_time);- Moves the TCP in a linear trajectory to an absolute Cartesian pose.xyzin metres,yprin degrees.HAL::MoveRelLinear(xyz, speed, wait_time);- Moves the TCP by a relative Cartesian increment.xyzisstd::array<double, 3>in metres.HAL::MoveRelReor(ypr, speed, wait_time);- Reorients the TCP by relative angular increments.yprisstd::array<double, 3>in degrees.
Gripper
HAL::GripperSet(relative_closure, wait_time);- Controls the gripper.relative_closurein [0,100] (0 = fully open, 100 = fully closed). Whenrelative_closure<= 5 the gripper releases any attached object automatically.
Cameras
HAL::getImage(camera);- Returns a camera frame ascv::Mat.camerais"hand"(wrist-mounted) or"base"(fixed). Default:"hand".WebGUI::showImage(image);- Sends acv::Matframe to the browser image panel.
Perception filters
HAL::start_color_filter(color, rmax, rmin, gmax, gmin, bmax, bmin);- Starts an RGB color filter. Supported colors:"red","green","blue","purple". RGB values in [0,255].HAL::stop_color_filter(color);- Stops the color filter for the given color.HAL::start_shape_filter(color, shape, radius);- Starts shape detection on the color-filtered cloud. Supported shapes:"sphere","cylinder".radiusin metres.HAL::stop_shape_filter(color, shape);- Stops the shape filter.
Object and target queries
HAL::get_object_position(object_name);- Returns the position of a known object asstd::array<double, 3>[x, y, z] in metres. Returns{0, 0, 0}if not found.HAL::get_object_info(object_name);- Returns anObjectInfostruct with fields:position,height,width,length,shape,color. Checkinfo.shape.empty()to detect a not-found object.HAL::get_target_position(target_name);- Returns the position of a target zone asstd::array<double, 3>in metres.
Workspace
HAL::scan_workspace();- Moves to a scan pose, triggers environment scanning, and returns home.HAL::buildmap();- Runs a full environment mapping procedure.HAL::gripper_percentage_for(diameter, max_open_m);- Converts an object diameter (m) to gripper closure percentage.max_open_mdefaults to0.085m.
In order to use the HAL-based controls you must include the following lines:
#include "HAL.hpp"
#include "WebGUI.hpp"
#include "Frequency.hpp"

void exercise() {
    Frequency freq = Frequency();
    // Enter sequential code!

    while (true)
    {
        // Enter iterative code!
        freq.tick();
    }
}
Argument examples
Home and intermediate poses (joint space, in degrees)
home = {0.0, -90.0, 70.0, -70.0, -90.0, 0.0}
pre_pick = {0.0, -90.0, 90.0, -90.0, -90.0, 0.0}
pre_place = {180.0, -90.0, 90.0, -90.0, -90.0, 0.0}
Examples of absolute XYZ poses for MoveJoint and MoveLinear (in metres)
above_object = {object_pos[0], object_pos[1], object_pos[2] + 0.15}
at_object = {object_pos[0], object_pos[1], object_pos[2] - 0.025}
above_target = {target_pos[0], target_pos[1], 0.40}
transition = {-0.20, 0.0, 0.55}
Example TCP orientation (YPR, in degrees)
down = {180.0, 0.0, -90.0}
Color filter presets
red - rmax=255, rmin=100, gmax=40, gmin=0, bmax=40, bmin=0
green - rmax=40, rmin=0, gmax=255, gmin=100, bmax=40, bmin=0
blue - rmax=40, rmin=0, gmax=40, gmin=0, bmax=255, bmin=100
purple - rmax=255, rmin=100, gmax=120, gmin=0, bmax=255, bmin=50
Gripper closure per shape
sphere - HAL::GripperSet(25.0, 1.0)
cylinder - HAL::GripperSet(45.0, 1.0)
Object and target names
Objects: “red_sphere”, “green_sphere”, “blue_sphere”, “purple_sphere”, “red_cylinder”, “green_cylinder”, “blue_cylinder”, “purple_cylinder”
Targets: “target1” .. “target16”
Instructions for ROS 2 Node Templates
If you prefer a local ROS 2 workspace instead of Web Templates.
- Install the General Infrastructure.
- Create a ROS 2 workspace and clone the Industrial Robots exercise packages required by Machine Vision.
- Resolve dependencies with
rosdep, build withcolcon, and source theinstallsetup. - Launch the exercise with the provided
ros2 launchfile from the exercise package. (Launch file names can vary per release; check the package README.)
Note: The old ROS 1 (Melodic/catkin/roslaunch) instructions are deprecated for this migration.
How should I solve the exercise?
Edit your main script and implement the high‑level flow using HAL. A typical sequence:
# 1) Build an obstacle map
HAL.buildmap()

# 2) Return to a clean start state
HAL.back_to_home()

# 3) Detect one object (example: green cylinder)
HAL.start_color_filter("green", 255, 50, 255, 50, 255, 50)
HAL.start_shape_filter("green", "cylinder", 0.04)
pos = HAL.get_object_position("green_cylinder")
HAL.stop_shape_filter("green", "cylinder")
HAL.stop_color_filter("green")

if pos is not None:
    # 4) Approach, grasp, and lift
    approach = [pos[0], pos[1], pos[2] + 0.10]
    tcp_rpy  = [0, 90, 0]  # example orientation
    HAL.MoveLinear(approach, tcp_rpy, 0.2, 0.5)
    HAL.MoveLinear([pos[0], pos[1], pos[2]], tcp_rpy, 0.1, 0.0)
    HAL.GripperSet(0, 0.3)  # close
    HAL.attach("green_cylinder")
    HAL.MoveRelLinear([0, 0, 0.10], 0.2, 0.3)

    # 5) Place at a target
    target = HAL.get_target_position("target6")
    place_top = [target.x, target.y, target.z + 0.10]
    place_pos = [target.x, target.y, target.z]
    HAL.MoveLinear(place_top, tcp_rpy, 0.2, 0.0)
    HAL.MoveLinear(place_pos, tcp_rpy, 0.1, 0.0)
    HAL.GripperSet(100, 0.3)  # open (auto-detach)
    HAL.detach()
    HAL.MoveRelLinear([0, 0, 0.10], 0.2, 0.2)
If planning fails (
Fail: ABORTED: No motion plan found. No execution attempted.), the pose is likely unreachable. Adjust Z‑clearance or orientation and retry.
Theory
Object Detection
Object detectors are implemented on top of PCL. First, a color filter removes points outside the chosen RGB range. Then a shape segmentation detects the most likely sphere or cylinder for that color (given an approximate radius), producing a TF frame and debug topics. With this info, you can compute approach and grasp poses.
Obstacle Detection and Avoidance
Point clouds are used to update the planning scene (octomap) via the camera mounted on the robot. Build a map by moving the robot to view the workspace; obstacles are then considered during planning to avoid collisions.
Hints
How to write buildmap()
Move the robot through several viewpoints so the wrist camera can observe the surroundings. The point cloud is fused into an octomap that MoveIt 2 uses as collision geometry.
How to use get_object_position()
- Pick color/shape and approximate radius.
- Start color filter, tune RGB limits; verify with the GUI image feeds.
- Start shape filter, verify with debug topics; adjust radius if needed.
- Read position with
HAL.get_object_position(object_name)and approach with a safe Z clearance. - Stop filters when done to avoid noisy results.
How to check filter results
Two image panes are provided in the GUI. Select the topics to view color‑filtered and shape‑filtered images. For 3D inspection, open RViz and switch the PointCloud topic to the filter output. If nothing is detected, the image remains black or the cloud does not update.
Limitations of gripper simulation
Grasp simulation can be imperfect; objects may slip. Consider a run successful if the map is built and the desired object is picked reliably.
Ignorable ERROR and WARNING
No p gain specified for pid.- Other transient TF/initialization warnings at startup (only if they stop repeating after the system settles).
Object and Target lists
Object list:
- red_ball
- green_ball
- blue_ball
- yellow_ball
- red_cylinder
- green_cylinder
- blue_cylinder
- yellow_cylinder
Target list: target_ID, where ID from 1 to 16.