Quick start CARLA
Table of Contents
- Running an example
- Building your configuration file
- Using the application
- Launching different objects in CARLA
Running an example
First, you need to install Behavior Metrics. If you haven’t completed that step, please go to the installation section.
We additionally have some pretrained models that you can use in Behavior Metrics to illustrate how it works. Find them in the model zoo.
If you’d like to train your own imitation learning based model, we provide you with a dataset.
We provide examples for the follow-lane task using CARLA:
- For an example of a robot brain using a Tensorflow model for control with GUI pipeline, run:
python3 driver_carla.py -c configs/CARLA/default_carla_tensorflow.yml -g
- For an example of a robot brain using a PyTorch model for control with GUI pipeline, run:
python3 driver_carla.py -c configs/CARLA/default_carla_torch.yml -g
- For an example of an explicitly programmed robot brain with GUI pipeline, run:
python3 driver_carla.py -c configs/CARLA/default_carla.yml -g
- For an example of the headless pipeline, run:
python3 driver_carla.py -c configs/CARLA/default_carla_multiple.yml -s
When running the previous commands with the -g flag, they will launch the GUI application:
- CARLA simulator with ego vehicle.
- Sensors: Bird-eye-view, RGB camera, ground-truth segmented camera and odometry
- Actuators: Motors
- Example brain with example Tensorflow model.
The program allows the following arguments:
-c <profile>or--config <profile>: this argument is mandatory and specifies the path of the configuration file for the application.-gor--gui: this argument is optional and enables the GUI launching.-sor--script: this argument is optional and enables the scriptable application.
For more information run help driver.py in a terminal.
Building your configuration file
If you want to create your own configuration file for the application (changing the vehicle, brain, scenario, model, etc) you can create a yml file with your own configuration.
The default_carla_tensorflow.yml looks like this (Make sure you respect the indentation):
Behaviors:
Robot:
Sensors:
Cameras:
Camera_0:
Name: 'camera_0'
Topic: '/carla/ego_vehicle/rgb_front/image'
Camera_1:
Name: 'camera_1'
Topic: '/carla/ego_vehicle/rgb_view/image'
Camera_2:
Name: 'camera_2'
Topic: '/carla/ego_vehicle/semantic_segmentation_front/image'
Camera_3:
Name: 'camera_3'
Topic: '/carla/ego_vehicle/dvs_front/image'
Pose3D:
Pose3D_0:
Name: 'pose3d_0'
Topic: '/carla/ego_vehicle/odometry'
BirdEyeView:
BirdEyeView_0:
Name: 'bird_eye_view_0'
Topic: ''
Speedometer:
Speedometer_0:
Name: 'speedometer_0'
Topic: '/carla/ego_vehicle/speedometer'
Actuators:
CARLA_Motors:
Motors_0:
Name: 'motors_0'
Topic: '/carla/ego_vehicle/vehicle_control_cmd'
MaxV: 3
MaxW: 0.3
BrainPath: 'brains/CARLA/tensorflow/brain_carla_bird_eye_deep_learning.py'
PilotTimeCycle: 50 # Turn up to reduce number of control decisions
AsyncMode: True # Set to False to control simulator time
Parameters:
Model: 'pilotnet.h5'
ImageCropped: True
ImageSize: [ 200,66 ]
ImageNormalized: True
PredictionsNormalized: True
GPU: True
UseOptimized: False
ImageTranform: ''
Type: 'CARLA'
Simulation:
World: configs/CARLA/CARLA_launch_files/town_02_anticlockwise.launch
RandomSpawnPoint: False
Dataset:
In: '/tmp/my_bag.bag'
Out: ''
Stats:
Out: './'
PerfectLap: './perfect_bags/lap-simple-circuit.bag'
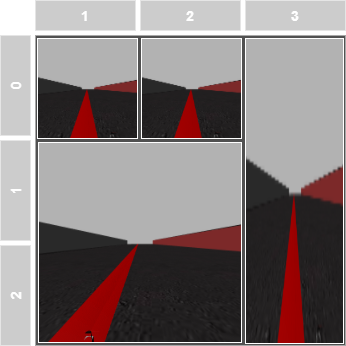
Layout:
Frame_0:
Name: frame_0
Geometry: [1, 1, 1, 1]
Data: rgbimage
Frame_1:
Name: frame_1
Geometry: [0, 1, 1, 1]
Data: rgbimage
Frame_2:
Name: frame_2
Geometry: [0, 2, 1, 1]
Data: rgbimage
Frame_3:
Name: frame_3
Geometry: [1, 2, 1, 1]
Data: rgbimage
The keys of this file are as follows:
Robot
This key defines the robot configuration:
- Sensors: defines the sensors configuration. Every sensor must have a name and a ROS topic.
- Actuators: defines the actuators configuration. Every actuator must have a name and a ROS topic.
- BrainPath: defines the path where the control algorithm is located in your system.
Simulation
This key defines the launch file of the simulator.
Layout
This key defines how the GUI will be shown. This is the trickiest part of the configuration file. The grid of the GUI is a 3x3 matrix where you can configure the layout positions to show your sensors data. Each Frame_X key corresponds to a view of a sensor in the GUI and includes the following keys:
- Name: this is mandatory in order to send data to that frame in the GUI to be shown.
- Geometry: is the position and size configuration of that frame following this criteria: ` [x, y, height, width]`
- Data: tells the GUI which kind of GUI should be create in order to show the information. Possible values: rgbimage, laser, pose3d.
The geometry is defined as follows.

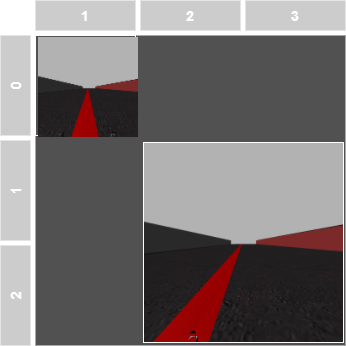
So if you want to create a view for one of the camera sensors of the robot located in the top-left corner of size 1x1 followed by another view of another camera in the bottom-right corner of size 2x2, you should configure the geometry array as:
Frame_0:
    Name: 'Camera1'
    Geometry: [0, 1, 1, 1]
    Data: rgbimage
Frame_1:
    Name: 'Camera2'
    Geometry: [1, 2, 2, 2]
So it will look like this in the GUI:
Following this logic, you will see that the default configuration file will show something like this:
Using the application
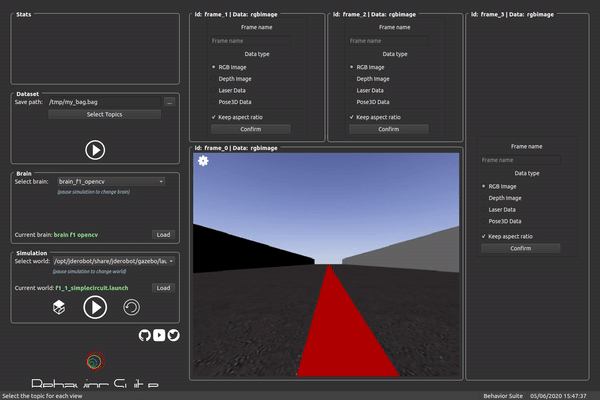
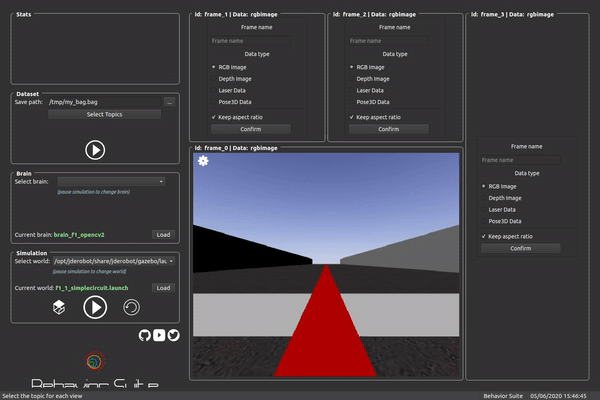
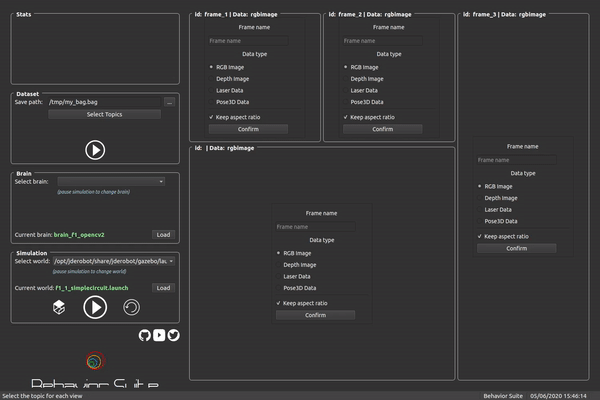
Once the configuration file is created and the application has launched, you will see something like this (depending on your layout configuration). We assume you launched the default configuration file:
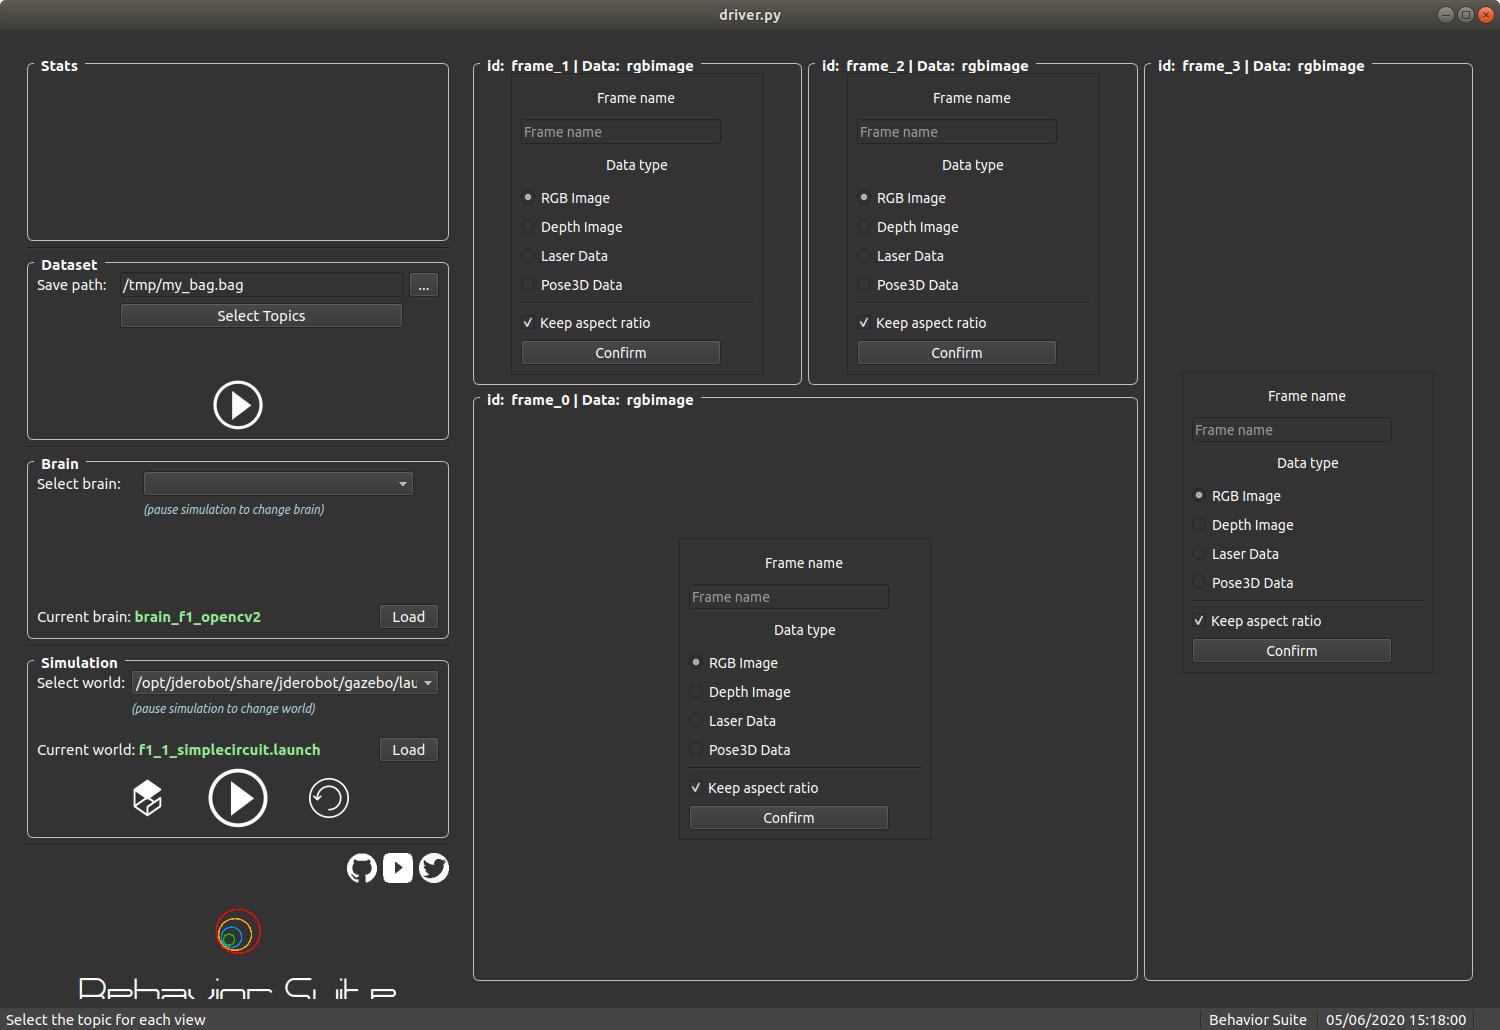
You will see 2 different sections, one on the left: the toolbar, and another one in the right: the layout.
The toolbar
You have all the tools needed for controlling the whole application, simulation and control of the application. For usability, this section is subdivided in 4 different subsections: stats, dataset, brains and simulation.
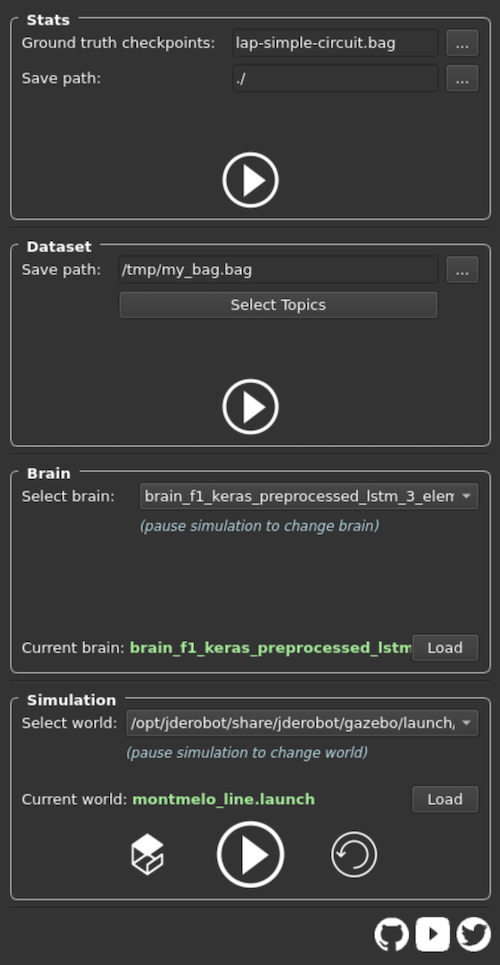
Stats
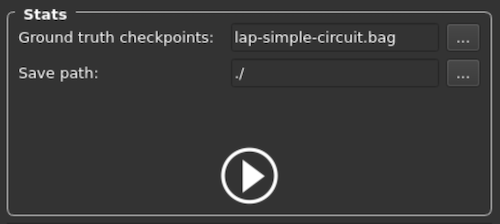
You can save metrics from the brain with the stats functionality. For saving, press play while the brain is running and press again to finish. After that, a general view of the evaluated metrics should appear.
Dataset
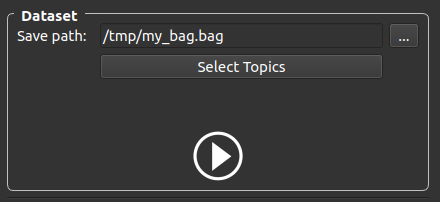
This subsection will allow you to specify where the datasets will be saved by setting up the path and the name of the bag file.
To specify the output ROS bag file, just click on the three dots and a dialog window will open with the file system.
The button Select topics is used to select which active topics the user wants to record in the ROS bag file.
Use the play button to start/stop recording the rosbag.
Note: if you don’t change your ROS bag name between recordings, the file will be overwritten with the new recording data.
Brain
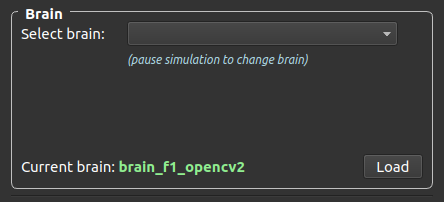
This subsection will allow you to control the logic of the robot, its controller.
You have a drop-down menu that will detect the available brains for the current simulation, so you can select whatever brain you want in each moment. This can be done on the go, if the simulation is paused
The Load button will load a new brain in execution time if the simulation is paused
All of this tools will be disabled while the simulation is running, so in order to interact with it, you should pause the simulation first.
Simulation
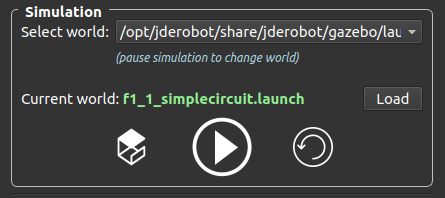
This subsection will allow you to control the simulation.
You have a drop-down menu to change the scenario of the simulation on the go if the simulation is paused
The Load button will load the specified scenario in the drop-down menu if the simulation is paused
You have 2 additional buttons which:
- Play/pause button for pausing/resuming the simulation
- Reload button will reload the simulation by resetting the robot position and both real and simulation time.
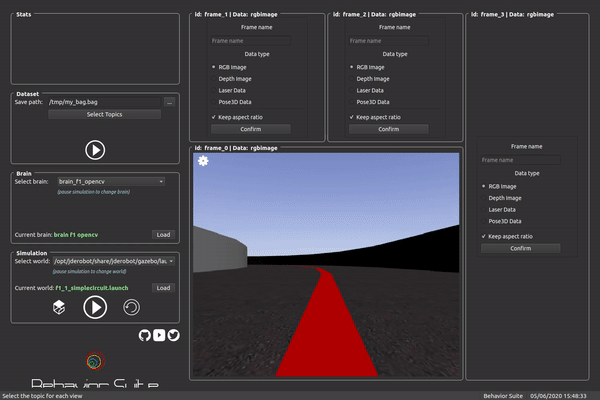
The layout
This section is meant to show the data coming from the sensors of the robot (cameras, laser, odometry, etc.). For that purpose, the GUI is divided in sections conforming a layout. This disposition will come specified in the configuration file (see Building your configuration file) section.
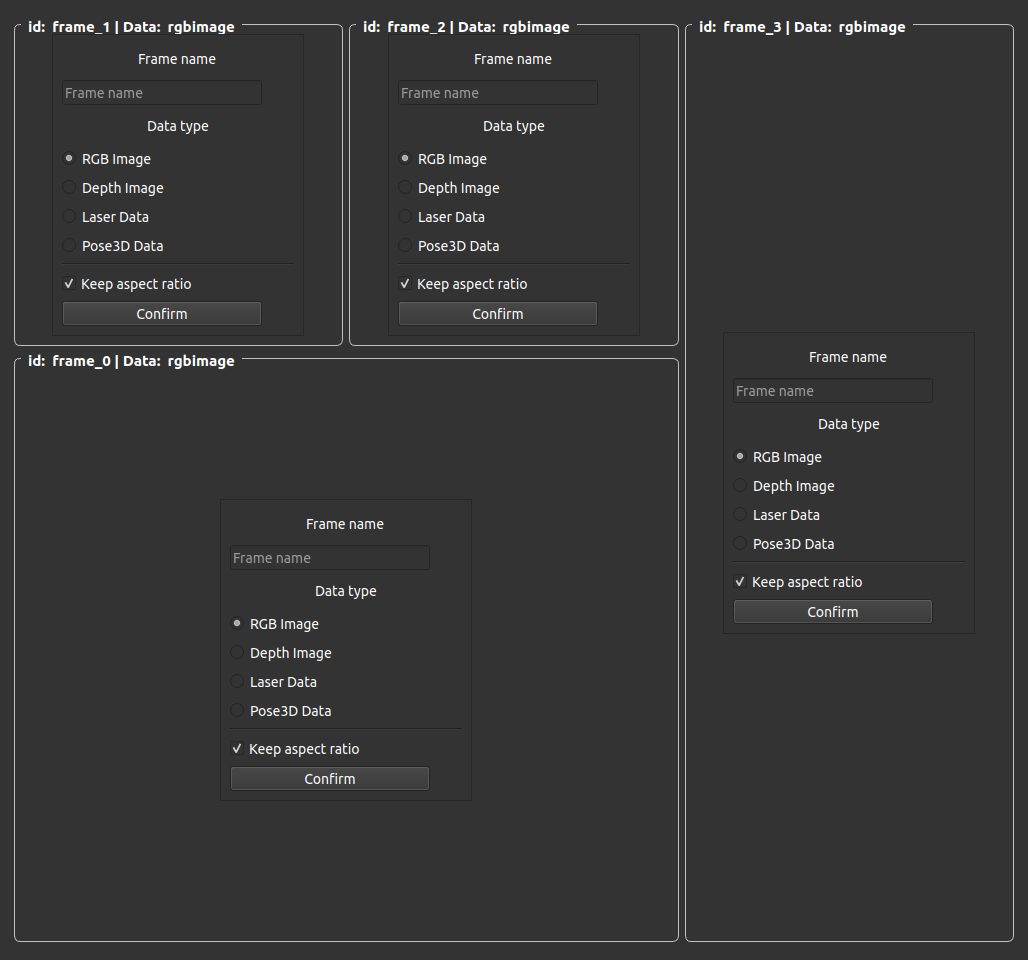
As you can see, there are several boxes or frames that will host data from different sensors. The view above shows the GUI before specifying what kind of sensor and data the frame will show. You only have to give the frame a name (if you leave it blank it will take the default name frame_X where X is the frame number), and pick which kind of data that frame will contain by clicking on one of the radio buttons.
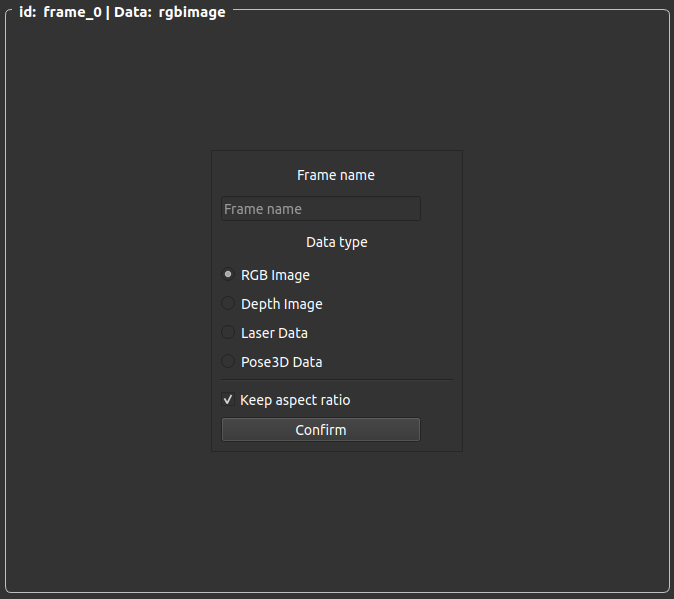
As you type down the name of the frame, you will see how the name in the top-left corner of the frame changes dynamically.

Once you have chosen the frame name (this is important for later), you have to chose the data type the frame will show, from one of the checkboxes below the name textbox. After that, you will only have to click the Confirm button and the sensor will show its data.
Launching different objects in CARLA
By default, while running python3 driver_carla.py -c configs/default_carla.yml -g , CARLA allows to spawn an ego vehicle along with its sensors. The default object file called here can be found in $(find carla_spawn_objects)/config/objects.json.
However, we can spawn different objects in the simulation by changing the object file.
To spawn, For Eg: an additional car (here an Audi), as an obstacle in CARLA Town, we can add the following in the object file at relevant hierarchy after the ego vehicle object:
{
    "type": "vehicle",
    "id": "vehicle.audi.a2",
}
A sample CARLA object file for this can be found here.
The new object file env variable can be set as below:
export OBJECT_PATH=<PATH-TO-CARLA-OBJECT-FILE>
Now, replace the value of objects_definition_file args in the corresponding CARLA launch file with '$(env OBJECT_PATH)'
Sample launch file for this can be found here
Now, pass this launch file to the CARLA configuration file default_carla.yml (under the World parameter) and run the driver as usual by python3 driver_carla.py -c configs/default_carla.yml -g.